Friday, March 30, 2007
More to Come Soon
I've been away from writing, but I'll be posting again soon--I promise. I have over a week's backlog of dinners and about 2 weeks of backlogged beer reviews to post. Don't worry--it's not all from memory; I've been taking notes:) More content to come soon, I promise.
Saturday, March 17, 2007
Adventures in Dried Beans
In the past, I have avoided certain ingredients due to fear of the unknown, usually because they seem too complicated to deal with and I’m not prepared (or lack the necessary time) to learn. I resolved in the past year to no longer face new ingredients with fear and instead to charge ahead, try my hand at them, and see what happens. Until recently, my cooking with beans involved mostly canned beans, and not beans in their dried state. The only dried beans that I had used were lentils, because they did not require a pre-soaking period. It was the pre-soaking period, as well as the seemingly numerous instructions surrounding the use of dried beans (pre-soaking, skimming foam from the top of the cooking beans, etc.) that had given me pause for thought on using them in the first place. I eventually cast my fear aside, performed the necessary research and got started on incorporating dried beans into my cooking repertoire.
In my first attempt with dried beans used great northern and navy beans in a soup. I followed the pre-soaking directions that I had read in one of my bean-centric cookbooks. The results were great; the beans had a great flavor and a nicer texture than I’ve obtained in the past using canned beans in a similar application. Dried beans were a hit.
The next time I used the dried beans, I attempted to mimic a cold bean salad that I had tried from the Whole Foods salad bar. It was a white bean salad, with some red onion, fresh dill and lemon. This time, I was a little short on time so I decided to use what’s known as the “quick soaking method” for soaking the beans. This method involves bringing the beans to a boil in a large amount of water, turning off the heat and letting them sit in the hot water for a couple of hours. This is supposed to accomplish the same effect as the longer soak in the cold water; some of the more potent starches in the beans (that cause gastric and intestinal upset) are supposed to be dissolved in the soaking process (and the long and quick soak are supposed to be equally effective). So, I followed the quick soaking method and then cooked the beans as usual. I combined the rest of my chosen ingredients for the salad and chilled it for a few hours to meld. We ate dinner a few hours later, with this salad as a side dish to a main that I cannot remember. At the time, the verdict was good; the texture of the beans was soft yet firm, and the flavor of the salad was great.
Until the next day. Although we really both liked the salad, mysteriously neither of us even touched the leftovers. A few days later, when I was performing refrigerator clean-out, I mentioned to Jim how neither of us ate any of the bean leftovers. Then I asked him: did they get to you like they got to me? Yes. Both of us struggled for over a day with some of the most irritating intestinal upset either of us had ever experienced, but had not mentioned it to each other. Well, the full container of leftover bean salad was enough of an indicator that there was something wrong (usually I’ll eat any leftovers; in this case, I was just plain scared of those). I think I’ll do the long cold pre-soaking from now on; better safe than sorry (and gassy).
For Friday night’s dinner this week I decided to make a black bean soup using a bag of black beans that I recently purchased. This was my first time using dried black beans. I got up plenty early in the day, to ensure the 8-hour minimum pre-soak that would ensure intestinal peace. By evening time, the beans had soaked long enough so I began the rest of the soup preparation.
I sautéed one diced sweet yellow onion, three ribs of celery (diced), three diced carrots, one diced red bell pepper, one diced poblano pepper and two small slices of Canadian bacon (diced finely) over medium heat until they were softened. I added 10 cloves of minced garlic and two seeded, de-ribbed and diced jalapeno peppers, and cooked the mixture about one minute longer. I then added about 1 T of dried oregano, 2 t of ground cumin, 1 t of ground coriander, 1 T of New Mexico chili powder, and a dash of garlic powder (for a little extra shot of garlic…because 10 cloves clearly is not enough). I then added the 1-cup of pre-soaked and drained beans, and about 4 cups of chicken stock and two bay leaves. I brought the mixture to a boil, covered the pot partially and let it boil gently for about an hour and a half.
I intended to add tomato and sherry (of course) to the beans, but waited until most of the cooking time had elapsed before doing so. I have read in many places that acids added in the early stages of bean cooking will cause the skins to toughen and increase the cooking time. The last thing I wanted was undercooked beans, so I waited until the beans were about a half hour away from being done before adding about one-half can of diced tomatoes and one-half can of crushed tomatoes (this was just because that’s what I had on hand; one whole can of either would probably do just fine). I let the beans continue to cook for another half hour or so, adding a little more spices and herbs to taste. I then added about ½ of chopped cilantro, and some extra chopped poblano and jalapeno peppers. Then, I whipped out the immersion blender (pictured below, for reference). We wanted a fairly chunky soup, but I did want a thicker broth than we had at that point. So, a short blending with this fine piece of equipment did the trick. After blending I added some additional chopped fresh cilantro, some chopped green onions and some more chopped peppers. I served diced red onion, additional cilantro, chopped avocado, additional green onion and sour cream as garnishes.

 We also had crab quesadillas with our soup. I had some left over crab quesadilla filling in the freezer from the Super Bowl, so I added the left over crabmeat from last night (because I didn’t use the entire 16 ounce cup on the pizza) and some extra cilantro to the leftover filling. The leftover filling basically consists of a diced yellow onion, cooked over low heat. I added some flour and then a little low-fat milk and broth to make a roux. I cooked this for a bit and then added some light cream cheese. Off heat, I added crab, a ton of chopped cilantro and some hot peppers. Used as a filling in whole-wheat tortillas, it cooks up very nicely in a large omelet pan, and the final product will hold (wrapped in foil) nicely in the oven for a good amount of time.

I, of course, also had a side salad (not pictured), with some salsa and a dash of light sour cream for a dressing. Now, we’ll just keep our fingers crossed that the 8-hour pre-soaking time was enough to keep us in the clear for the next day.
In my first attempt with dried beans used great northern and navy beans in a soup. I followed the pre-soaking directions that I had read in one of my bean-centric cookbooks. The results were great; the beans had a great flavor and a nicer texture than I’ve obtained in the past using canned beans in a similar application. Dried beans were a hit.
The next time I used the dried beans, I attempted to mimic a cold bean salad that I had tried from the Whole Foods salad bar. It was a white bean salad, with some red onion, fresh dill and lemon. This time, I was a little short on time so I decided to use what’s known as the “quick soaking method” for soaking the beans. This method involves bringing the beans to a boil in a large amount of water, turning off the heat and letting them sit in the hot water for a couple of hours. This is supposed to accomplish the same effect as the longer soak in the cold water; some of the more potent starches in the beans (that cause gastric and intestinal upset) are supposed to be dissolved in the soaking process (and the long and quick soak are supposed to be equally effective). So, I followed the quick soaking method and then cooked the beans as usual. I combined the rest of my chosen ingredients for the salad and chilled it for a few hours to meld. We ate dinner a few hours later, with this salad as a side dish to a main that I cannot remember. At the time, the verdict was good; the texture of the beans was soft yet firm, and the flavor of the salad was great.
Until the next day. Although we really both liked the salad, mysteriously neither of us even touched the leftovers. A few days later, when I was performing refrigerator clean-out, I mentioned to Jim how neither of us ate any of the bean leftovers. Then I asked him: did they get to you like they got to me? Yes. Both of us struggled for over a day with some of the most irritating intestinal upset either of us had ever experienced, but had not mentioned it to each other. Well, the full container of leftover bean salad was enough of an indicator that there was something wrong (usually I’ll eat any leftovers; in this case, I was just plain scared of those). I think I’ll do the long cold pre-soaking from now on; better safe than sorry (and gassy).
For Friday night’s dinner this week I decided to make a black bean soup using a bag of black beans that I recently purchased. This was my first time using dried black beans. I got up plenty early in the day, to ensure the 8-hour minimum pre-soak that would ensure intestinal peace. By evening time, the beans had soaked long enough so I began the rest of the soup preparation.
I sautéed one diced sweet yellow onion, three ribs of celery (diced), three diced carrots, one diced red bell pepper, one diced poblano pepper and two small slices of Canadian bacon (diced finely) over medium heat until they were softened. I added 10 cloves of minced garlic and two seeded, de-ribbed and diced jalapeno peppers, and cooked the mixture about one minute longer. I then added about 1 T of dried oregano, 2 t of ground cumin, 1 t of ground coriander, 1 T of New Mexico chili powder, and a dash of garlic powder (for a little extra shot of garlic…because 10 cloves clearly is not enough). I then added the 1-cup of pre-soaked and drained beans, and about 4 cups of chicken stock and two bay leaves. I brought the mixture to a boil, covered the pot partially and let it boil gently for about an hour and a half.
I intended to add tomato and sherry (of course) to the beans, but waited until most of the cooking time had elapsed before doing so. I have read in many places that acids added in the early stages of bean cooking will cause the skins to toughen and increase the cooking time. The last thing I wanted was undercooked beans, so I waited until the beans were about a half hour away from being done before adding about one-half can of diced tomatoes and one-half can of crushed tomatoes (this was just because that’s what I had on hand; one whole can of either would probably do just fine). I let the beans continue to cook for another half hour or so, adding a little more spices and herbs to taste. I then added about ½ of chopped cilantro, and some extra chopped poblano and jalapeno peppers. Then, I whipped out the immersion blender (pictured below, for reference). We wanted a fairly chunky soup, but I did want a thicker broth than we had at that point. So, a short blending with this fine piece of equipment did the trick. After blending I added some additional chopped fresh cilantro, some chopped green onions and some more chopped peppers. I served diced red onion, additional cilantro, chopped avocado, additional green onion and sour cream as garnishes.
We also had crab quesadillas with our soup. I had some left over crab quesadilla filling in the freezer from the Super Bowl, so I added the left over crabmeat from last night (because I didn’t use the entire 16 ounce cup on the pizza) and some extra cilantro to the leftover filling. The leftover filling basically consists of a diced yellow onion, cooked over low heat. I added some flour and then a little low-fat milk and broth to make a roux. I cooked this for a bit and then added some light cream cheese. Off heat, I added crab, a ton of chopped cilantro and some hot peppers. Used as a filling in whole-wheat tortillas, it cooks up very nicely in a large omelet pan, and the final product will hold (wrapped in foil) nicely in the oven for a good amount of time.I, of course, also had a side salad (not pictured), with some salsa and a dash of light sour cream for a dressing. Now, we’ll just keep our fingers crossed that the 8-hour pre-soaking time was enough to keep us in the clear for the next day.
I’m Unemployed; Let’s have pizza
I’ve had a craving lately for my homemade pizza, but I didn’t have the opportunity to make it until this Thursday. It’s not normally much of a weeknight meal, due to the 2 hour rising time required for the dough (seeing as how I typically get home from work at 8 pm or later, that really doesn’t work). But, as of Wednesday of this week I am blissfully unemployed (until Monday, that is). So, I finally had the opportunity to make pizza on a weeknight.
Hours before Jim was due to arrive home from work, I began the dough. I first made this dough on Christmas, when I prepared a Pissaladiere as an appetizer to our Christmas meal (this is a French Provencal “pizza” covered with caramelized onions, olives, thyme and anchovies). The dough was tasty and easy to work with, and I thought it would make a fine dough for a slightly more mainstream pizza. This dough was made entirely with white flour, however, which just won’t do. So I swapped out ¾ of the bread flour with whole-wheat flour to make a whole-wheat crust. Those results were good; the crust was still easy to work with and baked up well, but now had the wonderful hearty flavor of whole wheat. Then, I had the idea to add quinoa flour to the crust. If you haven’t had quinoa, try it. It’s actually not a grain (it’s the seed of a grassy plant), but it behaves much like one for cooking purposes (so it’s most often referred to as a grain). It has a great, nutty flavor; really unlike anything else. It’s probably my favorite “grain” to use in cooking, because of its short cooking time and great taste. It also has a great nutritional profile; it’s naturally fairly low in fat, high in protein (it’s either a complete protein or really close; unusual for a grain) and high in fiber. I had a sack of quinoa flour in the house, which I had bought with the intent of adding it to baked goods here and there. Why not start now?
The flour blend for the quinoa pizza dough consists of ½ c bread flour (this is a non-whole wheat product), 1 cup of stone ground whole-wheat flour and ½ cup of quinoa flour. Quinoa flour is a gluten free product, so you can’t go too hog-wild in substituting it for other flours without changing the nature of your baked good. From the research I did, it seemed that the consensus was that you could substitute up to half of your regular flour with quinoa flour. Being painfully risk averse, I went for the ¼ substitution instead.
I placed the flours in the work bowl of my food processor, which I fitted with the dough blade (it has shorter arms and is more blunt than the regular chopping blade). I added 1 ½ t of rapid rise yeast, about 1 t of salt and ½ t of sugar. I pulsed the machine to blend. I added about 1 T of flaxseed meal (which is a replacement for fats in cooking, rather than flours—this surprised me, since it has the appearance of a flour-like product) and a scant 2 t of olive oil. With the machine still running, I slowly poured in about 1 c of warm water (about 110 degrees). I poured in the water until the dough formed a ball and spun around the outside of the work bowl. I then turned the dough out onto a floured cutting board and kneaded it for a couple of minutes. I kneaded this dough longer than I would have for a non-quinoa dough, because of the missing gluten in the quinoa flour. As I understand it, kneading dough spurs the formation of gluten, which is what gives baked goods their structure. It would seem that a dough partially comprised of a gluten-free flour would have a disadvantage for gluten formation, so maybe a little extra kneading would help the process. Besides that, it’s fun.
I formed the dough into a ball and placed it in a 4-cup glass measuring cup that I had sprayed with olive oil (using my handy olive oil sprayer—now that was a great purchase). The use of the glass measuring cup was a tip that I picked up from Cook’s Illustrated magazine. Since yeasted dough recipes usually will tell you let something rise until something has “doubled in volume”, a measuring cup with clear markings will help you to judge when the sufficient rise has occurred. I covered it loosely with plastic wrap, and continued my chores elsewhere in the house while the yeast did its work. It was nice and warm in the house that day (it was freakishly warm outside, having reached nearly 70 degrees), so I didn’t need to make any special arrangements to provide a warm spot for the rise (sometimes I’ll turn the oven on a low setting and set the bowl on the stovetop to ensure a warm enough environment for the yeast to grow).
To celebrate my newfound freedom from employment, we had gone out the night before with friends to a beer bar/restaurant that serves brick oven pizzas. One of the pizzas that we shared was a lobster pizza. It was so good; I can hardly describe (although they’re pretty cheap with the lobster—what do you expect, though?). We have no lobster at home, but we do have lots of crab (from the Giant food crab sale last week)…
I typically split the pizza dough into 2 smaller pizzas (they probably end up being 10-12 inches), each with different toppings. So I planned to make one of the pizzas will be a crabmeat pizza, with a little Fontina cheese and some fresh tarragon (the pizza at the restaurant had fresh tarragon on it; tarragon is one of my favorite herbs and it was a stand-out on the pizza). The other would be topped with an assortment of vegetables, fresh basil, goat cheese and freshly grated parmesan.
I set out to Whole Foods to grab a couple of last minute ingredients for dinner. One of the items on the list was the fresh tarragon that I craved so badly. Guess what…no tarragon. Great. They did, however, have Chervil (which is interesting, because when I want Chervil, I can almost never find it). Chervil is a far more muted than tarragon, but it does have a flavor slightly reminiscent of tarragon—a slight anise touch. So, I decided that I would sprinkle some dried tarragon on the pizza and use fresh Chervil as well. I picked up the remaining items for dinner (including a couple of craft beers, which I got carded for—yet again) and headed home.
One of the toppings for the pizza was to be caramelized onions. These are so easy to make, but they do take a little time (but very little attention—you can just let them cook away and wander back every-so-often to give them a little stir). Take a sweet yellow onion, halve and peel it. Cut off the root-end and cut the onion into long slices. Heat a little oil in a non-stick fry pan (medium to medium-high heat; we don’t want them to cook too fast). Add the onions and allow them to soften. When they start to turn a little translucent, add a bit of water and a sprinkle of sugar. And just let them continue to stew away, stirring here-and-there and adding additional water as needed. In about a half-hour, you’ll have soft and sweet onions.
The two pizzas are pictured below, ready to be cut and consumed. Yes, they are very "rustic"; that's how we like them. The veggie pizza was adorned with steamed broccoli, portobello mushrooms, cremini mushrooms, chopped tomatoes, basil, red bell peppers, caramelized onions, goat cheese and parmesan. The crab pizza had fontina cheese, caramelized onions, portobello mushrooms, dried tarragon and fresh chervil. Oh yeah, and crab; lots of it. You’ll probably notice that the pizzas are not soaking in cheese; that’s the health-conscious part of me rearing it’s ugly (but fit) head. Not being a total nut, I provided Jim with a generous amount of extra cheese that he could add to his slices.
Strange how everything tastes better when you don’t have to go to work the next day…here’s to a long weekend of long-awaited freedom (and a plunge into the unknown come Monday).
Friday, March 16, 2007
Sunday Night, Done Light
After a weekend of championship eating, I needed a light meal on Sunday night. I stuffed myself silly on Saturday at the bridal shower/bachelorette party, including a major over indulgence in a chocolate cake. There was a large amount of cake left over at the end of the night and I happily volunteered to take some home—way to take one for the team there. That cake was so good, as I think of it now I can feel that there’s a longing look in my eye…now all I have left is my fond memories of our time together. It was truly great. And it necessitated a Sunday night detox.
What’s best for a light evening meal? Soup, of course. Not a cream soup…something vegetable based. Fire-roasted Tomato and Fennel Soup should do the trick. This soup has its roots in a recipe from Fine Cooking magazine (November 2006; a great publication, if you have the time or inclination to check it out). I’ve made it a few times; eliminating, adding and changing ingredients—to the point where I feel comfortable calling it my own, so long as I acknowledge that the seed for the idea was provided by Fine Cooking.
I’ve been away from writing for a few days…wrapping up in preparation for leaving my job of nearly seven years. So, I made this on Sunday night but haven’t had a chance to write until now (Friday morning). And I didn’t actually take any notes as to what I did this time (yet another one of those instances where I just throw a bunch of stuff together and the dish tastes a little different every time I make it). So I’m just covering my ass so that if I misquote an ingredient, I’ve already got a defense in place…
To start, dice a large sweet yellow onion, one large fennel bulb (core removed, of course) and three or four large carrots. Heat these in a large soup pot with a spray of olive oil, over medium-high heat. You don’t really want them to brown, so don’t crank up the heat too high. Instead, we’re going for a gentle softening of the aromatics. When the onion, fennel and carrot are well softened, add 4-5 minced (or pressed) garlic cloves, 1 T of anise (or fennel) seeds and about 1 t of dried thyme. Cook about 1 minute longer, making sure not to burn the garlic, and then add a healthy splash of dry sherry (seems like I use this in everything, right? I do.) Add 2 cans of undrained fire-roasted tomatoes (Muir Glen is the only company that makes these, as far as I’ve seen), and about 1 cup of chicken broth (no idea on how much I really used here—do what seems right for the degree of looseness you want in your soup). Add a splash of orange juice (this was in the original recipe and it’s a fine idea, since orange and fennel marry so well together). Increase the heat and allow the mixture to come to a slow boil. Let it cook at least 15 minutes, but feel free to let it go longer if you have the time (adding additional broth as needed to keep the mixture from becoming to stew-like). Add about 1 cup of torn fresh basil leaves and a splash of milk (Fine Cooking called for cream, and a fairly good dose of it—I don’t think so).
 Now, the fun part. I bought an immersion blender a couple of months ago (to whittle away at the build-up of Williams Sonoma gift cards that I had—somehow, someone got the idea that I like cooking…). The primary reason that I bought it was for making soups, and not wanting to be forced to ladle hot soup into a blender and play the-not having the soup explode out of the top of the blender when I turn in on-game. I had a bad experience with that exact issue. Last fall, Jim was working really insane hours on a project (the minimum weekly requirement was 65 hours, which they increased to 70 at the end). There was an Oktoberfest celebration that we had wanted to attend on a Saturday, but he had to work. He was so beaten down by the project by that point (these crazy hours had been going for months straight), so I felt like he needed a pick-me-up. So I made Oktoberfest at home. I spent the week leading up to that Saturday researching German cooking and planning out a full-scale German meal (which I thought he’d appreciate, having lived in Germany for four years as a young man). One of the dishes that I made was a roasted pork-tenderloin with a beer sauce. It was the beer sauce that got me in trouble. It involved making a soupy mixture of onions, beer and other flavorings and then pureeing the mixture in a blender (while it’s still hot). I transferred a portion of the sauce to the blender, held the top in place with a towel and turned it on. I was immediately covered in hot beer sauce. My kitchen was covered in hot beer sauce. This was an unbelievable disaster—what a mess. In particular, since I was working on a very tight schedule (I wanted to greet him when he came home from work with appetizers and some silly German music I got from iTunes…with dinner in good shape and ready for final preparations so we could just relax). The experience of being soaked in hot beer and onion and having to hunt down random pools of beer sauce all over my kitchen convinced me that the immersion blender was the way to go from then on. $80, well spent.
So, returning to the point at hand…if you don’t have an immersion blender you can ladle small portions of the soup into a blender (don’t fill it even half way) and carefully puree it (start at the slowest speed and work your way up—trust me.) Otherwise, just lower your immersion blender into the pot and give it a good blending. We like this soup sort of rustic and chunky, so I don’t generally puree it too much. But if you like your tomato soup as smooth as silk, by all means—blend to your heart’s content. Return the soup to a slow boil, let it simmer away for a few more minutes and then you’re ready to eat. It's pictured below, garnished with a bit of goat cheese (the side salad made the picture this time). Easy, light and quick. Perfect for a Sunday night.
What’s best for a light evening meal? Soup, of course. Not a cream soup…something vegetable based. Fire-roasted Tomato and Fennel Soup should do the trick. This soup has its roots in a recipe from Fine Cooking magazine (November 2006; a great publication, if you have the time or inclination to check it out). I’ve made it a few times; eliminating, adding and changing ingredients—to the point where I feel comfortable calling it my own, so long as I acknowledge that the seed for the idea was provided by Fine Cooking.
I’ve been away from writing for a few days…wrapping up in preparation for leaving my job of nearly seven years. So, I made this on Sunday night but haven’t had a chance to write until now (Friday morning). And I didn’t actually take any notes as to what I did this time (yet another one of those instances where I just throw a bunch of stuff together and the dish tastes a little different every time I make it). So I’m just covering my ass so that if I misquote an ingredient, I’ve already got a defense in place…
To start, dice a large sweet yellow onion, one large fennel bulb (core removed, of course) and three or four large carrots. Heat these in a large soup pot with a spray of olive oil, over medium-high heat. You don’t really want them to brown, so don’t crank up the heat too high. Instead, we’re going for a gentle softening of the aromatics. When the onion, fennel and carrot are well softened, add 4-5 minced (or pressed) garlic cloves, 1 T of anise (or fennel) seeds and about 1 t of dried thyme. Cook about 1 minute longer, making sure not to burn the garlic, and then add a healthy splash of dry sherry (seems like I use this in everything, right? I do.) Add 2 cans of undrained fire-roasted tomatoes (Muir Glen is the only company that makes these, as far as I’ve seen), and about 1 cup of chicken broth (no idea on how much I really used here—do what seems right for the degree of looseness you want in your soup). Add a splash of orange juice (this was in the original recipe and it’s a fine idea, since orange and fennel marry so well together). Increase the heat and allow the mixture to come to a slow boil. Let it cook at least 15 minutes, but feel free to let it go longer if you have the time (adding additional broth as needed to keep the mixture from becoming to stew-like). Add about 1 cup of torn fresh basil leaves and a splash of milk (Fine Cooking called for cream, and a fairly good dose of it—I don’t think so).
Now, the fun part. I bought an immersion blender a couple of months ago (to whittle away at the build-up of Williams Sonoma gift cards that I had—somehow, someone got the idea that I like cooking…). The primary reason that I bought it was for making soups, and not wanting to be forced to ladle hot soup into a blender and play the-not having the soup explode out of the top of the blender when I turn in on-game. I had a bad experience with that exact issue. Last fall, Jim was working really insane hours on a project (the minimum weekly requirement was 65 hours, which they increased to 70 at the end). There was an Oktoberfest celebration that we had wanted to attend on a Saturday, but he had to work. He was so beaten down by the project by that point (these crazy hours had been going for months straight), so I felt like he needed a pick-me-up. So I made Oktoberfest at home. I spent the week leading up to that Saturday researching German cooking and planning out a full-scale German meal (which I thought he’d appreciate, having lived in Germany for four years as a young man). One of the dishes that I made was a roasted pork-tenderloin with a beer sauce. It was the beer sauce that got me in trouble. It involved making a soupy mixture of onions, beer and other flavorings and then pureeing the mixture in a blender (while it’s still hot). I transferred a portion of the sauce to the blender, held the top in place with a towel and turned it on. I was immediately covered in hot beer sauce. My kitchen was covered in hot beer sauce. This was an unbelievable disaster—what a mess. In particular, since I was working on a very tight schedule (I wanted to greet him when he came home from work with appetizers and some silly German music I got from iTunes…with dinner in good shape and ready for final preparations so we could just relax). The experience of being soaked in hot beer and onion and having to hunt down random pools of beer sauce all over my kitchen convinced me that the immersion blender was the way to go from then on. $80, well spent.So, returning to the point at hand…if you don’t have an immersion blender you can ladle small portions of the soup into a blender (don’t fill it even half way) and carefully puree it (start at the slowest speed and work your way up—trust me.) Otherwise, just lower your immersion blender into the pot and give it a good blending. We like this soup sort of rustic and chunky, so I don’t generally puree it too much. But if you like your tomato soup as smooth as silk, by all means—blend to your heart’s content. Return the soup to a slow boil, let it simmer away for a few more minutes and then you’re ready to eat. It's pictured below, garnished with a bit of goat cheese (the side salad made the picture this time). Easy, light and quick. Perfect for a Sunday night.
Friday, March 9, 2007
Red Beans and Rice, now with Chicken!
Tonight, I skipped the gym in order to stop by Safeway on the way home (to polish off some of the grocery shopping for Saturday’s shower), and then home to make enough Red Beans and Rice (now, with chicken—as I said) to feed us tonight and tomorrow. This will enable me to visit the gym tomorrow for a much-needed punishing weight training workout and then come home to make “pita” filling (see yesterday’s entry), roll the “pita”, make clam dip and eat some leftovers (oh, and it being Friday: drink some fine craft beer—we usually go the nearby brewery on Friday evenings, where we’re almost embarrassingly regular, but we’ll have to skip it this week so I can cook for Saturday).
Red beans and rice. This started a while ago—probably at least a year. We ate out at a restaurant, and I had a side order of red beans and rice to go with my green salad. It was delightful (even though it was greasy restaurant fare and clearly made with long grain white rice). The beans were creamy, the rice was luscious and the whole mixture had a wonderful subtle spice. Just spectacular. On this rare occasion, I enjoyed something more than a plate full of greens.
So, I endeavored to recreate a similar concoction at home. On my first try I flew blind and made something that was passable but certainly not great. Before attempting for the second time, I did my now-typical round of psychotic recipe research. Every cookbook, all my favorite internet sources—mined for information on…just what do people put in this? Based on this, I threw a bunch of stuff together one night and…glory! It was fantastic. So fantastic that Jim went nuts over it—we had a ton of leftovers and he ate it happily for two more days (“wow, this is really great”—I think it’s one of those dishes that might benefit from a night in the fridge). This was a version that was truly just red beans and rice—no chicken yet. This was another sign that it was a real winner…this was a meatless meal and Jim was only too happy to eat it again and again (he’s happy to go meatless now and then, but he does like his meat/seafood).
The tragedy here? Idiot Lesley didn’t write down a stitch of what she did. And it was a combination of so many sources that it would be impossible to refer to any one recipe (or, really, any three) and try to retrace my steps. For some foolish reason, I probably thought I would just remember it next time. So, when I got a craving for this again in a few months, I took a blind crack at it again, thinking that I was retracing the steps of the last attempt. Disappointed! It was definitely edible, but not great. Not like last time—I simply just didn’t have it right (I was clearly leaving something out, but what?).
So, a couple of weeks ago, I had defrosted what I thought were two gigantic chicken breasts. Turned out there were two breasts (in one bag) and some boneless skinless thighs in the other (I don’t know how I confused frozen thighs with breasts, since the meat has totally different color—whoops). I forget what I was making at the time, but I opted to use only the breasts that night and leave the thighs for another application. Then the craving for red beans and rice hit. This is typically a fairly indulgent dish, often paired with sausage, etc. So adding these rich boneless skinless chicken thighs to it seemed very fitting (plus it seemed that they would stew quite nicely and become meltingly tender in the time it takes to cook brown basmati rice).
I threw a bunch of stuff together that night (after doing a scaled-down round of research that morning during breakfast, just to refresh my memory and try to spark some creative thinking), and added the chicken thighs to cook with the rice. This was it. Where are my paper and pen? After dinner (like immediately, before I started forgetting things), I wrote it down. This was about three weeks ago…so when the craving hit me this week, I was ready.
Red Beans and Rice, now with Chicken! (breasts this time)…
Before you begin with the beans and rice: soak the chicken in some flavoring while you do prep work. The flavor of choice here is soy sauce and ketchup. I know: ketchup? It gives a nice tomato flavor, with a little bit of salt (enhanced, of course, by the added soy sauce). Plus, I just adore ketchup. I don’t eat French fries any more (fried food, hmmm…not for me—my digestive system says “No” on that one), but the one thing that I always loved about them was the opportunity to douse them in ketchup. So, now when I want a ketchup rush, I roast white and sweet potatoes instead (with a ton of garlic and some green onions). I top them with loads of ketchup on my plate; Jim opts for sour cream (light, of course). Returning to the point at hand….let the breasts soak in this mixture while you do the rest of the prep. Note also that I de-boned two bone-in breasts halves and then cut each one if half down the center—this will give nice and manageable sized chicken pieces that can be easily manipulated in the stew later.
The red beans and rice mixture begins with what I understand to be the Cajun Mirepoix: onion (sweet yellow, as I typically use), celery and green bell pepper (1 onion, diced; about 5 ribs of celery, diced; about ½ to ¾ of a green pepper, diced). Sweat these over medium heat until they’re nice and soft. Then add 2 ribbed, seeded and diced Anaheim peppers (kind of like a green bell pepper, with a little dose of pleasant heat—they add a great flavor; if you can’t find Anaheim, try Poblano—but you may want to cut back to one pepper because these can be a little more spicy). Sweat these for a few more minutes, and then add 8-10 (yes, 8-10) cloves of garlic that have been put through a press. Next, come the spices (and I actually used a measuring spoon to compare my palm-measurements to reality this time, so they might actually be accurate): 1 ½ T dried thyme, ½ T (+) dried oregano, 1 T paprika, 1 T ground cumin, ½ T garlic power (not enough for you yet…?) and ½ T onion powder. Stir well, increase heat and allow the mixture to cook until very fragrant (1 minute?). Add ¾ c of rinsed brown basmati rice, stir well and let cook about 1 minute more. Add ½ c dry sherry; allow the excess moisture to cook off. Add 1 can drained and rinsed pinto beans and 1 can drained and rinsed dark red kidney beans. Stir well; add 1 can of can-top-drained fire-roasted diced tomatoes (from Muir Glen—these things are the best…I make a mean fire roasted tomato and fennel soup thanks to these). Add about ¾ c chicken broth, about 10 sprigs of fresh thyme (whole—we’ll fish out the stems later when the leaves fall off) and 3 bay leaves. I like to add about 10 sliced cremini mushrooms at this point, but if you’re not a mushroom fan feel free to eliminate them (it won’t hurt; this isn’t a mushroom-centric dish). Add one can of drained (to the extent that the can top allows you to) diced green chilies (a 4 oz can, I believe). Now, nestle the chicken pieces into the broth mixture (discarding the leftover soaking mixture), and let it come to a boil. Lower the heat, cover, and you’ll have dinner in about 40 to 50 minutes.
When the rice has cooked through, if there’s excess liquid just take the top off and increase the heat to let some of that boil away (or spoon some off if it’s really a lot). Add about 6 chopped scallions (white and green parts), 1 to 2 T of fresh thyme leaves (I’m sloppy—I just strip them off the stems by hand and if a couple of tender stems get in there, too bad—who ever gets the thyme stem does the dishes :-)), and ¼ chopped parsley. Fish out the bay leaves and thyme stems, and you’re ready to eat.
The verdict this time was that I hit it again, so I guess that the notes I made last time must have been fairly accurate. Now, we have leftovers for tomorrow night which we’ll eat while I make Spanakopita and clam dip for Saturday. Living for the weekend…and almost there. Thank goodness.
Thursday, March 8, 2007
So, what’s on sale this week?
It’s Wednesday again, which means it food-sale-information-release-day…my favorite. As I’ve said in a previous post, I rarely shop at Giant or Safeway anymore, but still spend some time looking through their advertisements, just to see what’s on sale each week. The big prize on Wednesday is the Harris Teeter on-line sales flyer. While I don’t go there regularly, because none of the stores are super-convenient to me in terms of location, they often have great sales on seafood and, to a lesser extent, produce. On sale this week in the seafood department? Scallops (that’ll usually get me in the store if the price is good), sockeye salmon, red snapper and black bass.
So, I will likely be stopping by “the Teet” (as I have come to refer to Harris Teeter in my own mind—I have no idea why; it’s so stupid) sometime soon. I’ve been calling it “the Teet” in my head for months, if not a year now, and just let one slip to Jim a few weeks ago. He looked at me kind of funny, and laughed. He calls it that now also, and seems to enjoy doing so. I think that he was actually a little surprised that I would refer to it that way. I guess it’s one of those things that makes you realize that there’s still more to learn about your living partner (and visa versa), just when you thought you knew all there was to know about the person. When a relationship starts, the amount that you learn about the person is so great, which adds a great deal of excitement to everything. Then, as time goes on and especially if you live together for a long period, the excitement of learning new things fades as the number of surprises you encounter grows fewer and fewer. Life becomes predictable. And then one day you actually find out something new about how the person thinks, feels, etc--it’s a pleasant reminder that there's always more to discover and share. “The Teet” is probably a stupid example, but it works for me.
So, back to the food stuff…unfortunately, I can’t dream too much about what to make for us this weekend because Sunday is my only cooking-for-home day. I have a bridal shower to attend on Saturday night, and I’ve been asked to provide several of the snacks.
On the menu:
Spankopita: Little phyllo wrapped packages of spinach and cheese. These are pretty easy to make; it only involves preparing a spinach, cheese, etc. blend and then rolling them up into little phyllo triangles. As I mentioned before, my mother is Greek, so my first attempt at pita (as we call it for short; not to be confused with the bread—it’s just so much easier to say “pita”) was based on her recipe. But, the classic question came up: what, no garlic? Her recipe was really a cheese and spinach blend (lots of cheese, 4 in total, including plenty of feta), with the only other flavoring being derived from pepper (as I understand it, no onions were used because several members of the family have an onion aversion—not just undercooked onions like me, but a total dislike). So, I have added chopped sweet yellow onion, sliced green onion, a healthy dose of garlic, a bunch of chopped fresh dill and chopped fresh parsley when I have some on hand. As far as the cheeses go, the original recipe called for feta, cottage cheese, ricotta and cream cheese. I use either cottage or ricotta (I feel that they both service the same purpose—as a salty filler) and I have added parmesan (opting of course of the ultra flavorful Parmesan Reggiano cheese). When I make pita for us at home, I don’t use butter to coat the dough and instead opt for more heart-healthy olive oil. Sometimes I’ll use butter just in the bottom of the pan and to brush on top of the triangles (butter browns the dough a little better; I usually when there are more than just Jim and I involved in the eating). For a crowd, however, I’ll probably end up using mostly butter—that’s what everyone expects, and I’d hate to disappoint.
This dish will require a trip to 2 different grocery stores, due to two of the ingredients involved. The feta cheese is best obtained at Trader Joes, who sell a wonderful feta from Greece that is made with sheep’s milk (which offers a nice flavor and also some comfort that no rBGT was used in it’s production). That is worth going out of my way for, and I can fill in a few other items from my shopping list while I’m there. (Whole Foods Market also carries a fine Greek goat’s milk feta and a Bulgarian sheep’s milk feta that is quite tasty—but TJ’s beats them on price in this instance). For the phyllo dough, Safeway is the ticket. Why? The Safeway Select phyllo dough is the very best one I have ever used. Its nutritional statistics are not exactly great (it is calorie laden, and I think there’s more fat it in than most other varieties), but it is such a pleasure to work with (perhaps on account of that added fat). You often hear cautionary words about working with phyllo dough: cover it with a damp towel while you work, work quickly and be gentle, etc. I’ve done everything to this dough that you’re not supposed to do: I defrost it on the countertop (instead of the fridge, which is a more gentle defrost for a fragile product), I refreeze my leftovers (and then thaw and refreeze them time and time again) and I often don’t even bother to cover it up with a towel while I work with it. And what does the dough give me for all of this abuse? Consistent and dependable service. The sheets rarely tear or stick together and it rolls like a dream. That is definitely worth a trip to Safeway.
Clam Dip: This is an old family recipe, and an absolute family favorite. It being a family recipe, I won’t write it out here (but if you know me well, feel free to ask for it; I might give it up :-)). Basically, it’s a cream cheese based dip with canned clams and flavored heavily with onion. We always serve it with Fritos (which my sister always likes for its minimalist ingredient list: Corn, oil, salt.). It MUST be served with Fritos. It basically amounts to crack on corn chips. This dip is very easy to go overboard on and, due to the abundance of cream cheese involved, that may not be a good idea for people with even slight lactose intolerance issues (such as myself). Despite such looming troubles, it is truly a delightful snack and thankfully very easy to make (and good to make ahead of time).
Guacamole: I’ve received a lot of good feedback over time for my Guac, hence the request to make it for Saturday. I make a very chunky dip, with lots of tomatoes. It starts with a little bit of finely diced red onion (I’d say a quarter to one-half of an onion), two stemmed and seeded jalapenos, one can of diced green chilies (drained to the extent that you can with the can top—yes, I’m lazy), about 5 diced plum tomatoes, about ¾ c to 1 c of chopped fresh cilantro and probably about 5 avocados (this makes a ton of Guac). I also add a bit of ground cumin, ground coriander and chili powder. I’m sure that I’m forgetting something as I write this; I think the last time I made it, I added some garlic powder (fresh garlic being a little too powerful uncooked and also hard to evenly distribute in the dip—but I can’t leave garlic out).
Tomato Bruschetta: (I know, Bruschetta is really the bread, but people always refer to the topping instead by this name). This, too, is a very simple dish. You take a whole bunch of plum tomatoes (for a good-sized batch, I’d say around 10), remove the seeds and dice them small. Add some finely chopped red onion, a whole lot of fresh chopped basil (that’s one of the primary flavors here, so don’t be shy), a lot of feta (crumbled—and see the notes on Feta selection above). Then, some salt and pepper, balsamic vinegar and a shy dose of olive oil. I know that I haven’t quoted any amounts here (a little of this, a little of that); that’s because I always make this dish entirely by sight, smell and taste. I don’t even know how much I add—I just know when it’s done. I added some chopped kalamata olives and chopped mint once too, which was delightful.
Greek Pasta Salad: Aha! Now comes my chance to use up the white pasta that we have in our basement from before we discovered whole wheat pastas. I would not dream of using white pasta for us at home, and we’ve had these three boxes of regular white pasta in the basement forever. Now’s my chance—make a break! And, yes, I checked the expiration dates. We’re all set to go. This is another measurement-by-the-senses dish, and I envision that it will include: pasta, chopped kalamata olives, feta cheese, chopped seeded cucumber, chopped plum tomatoes, chopped fresh dill, chopped fresh parsley, balsamic vinegar, lemon juice and olive oil (probably more than I’d use for us at home, since this is for the “general public”).
So, there it is. Now to prepare my shopping list, which will probably involve trips to at least 3 grocery stores. (I already mentioned TJ’s and Safeway, but I’m sure that there’s going to be some ingredient that I prefer to buy at WFM which will get me in there, too). Hopefully, in between all of this prep (to begin Thursday night, if possible, since both the pita filling and the rolled triangles can be frozen) I’ll have time to make a hearty helping of red beans, rice & chicken to feed us through Friday night.
Now, to figure out what I can make for us on Sunday night.
Wednesday, March 7, 2007
Greatest Hits, Volume 1: Stir Fry
Tuesday night is usually an “early” night at home. I arrived home just after 8 pm, ready to jam out dinner so we could hopefully be eating by 9. What’s for dinner, then? Stir fry! Since I haven’t defrosted any meat, this will be a shrimp stir fry, since frozen tail-on shrimp defrost quickly in a colander under some cold running water. Jim is very partial to peanut sauce, and having given him the choice of that or various other stir fry preparations earlier in the day (a brown/hoisin sauce, hot and sour, etc.), he immediately opted for peanut. Peanut sauce is one of his favorites, and is typically a leftover he’s not only willing, but eager to eat (“Can we have the leftover peanut ___ stir fry tonight?”, he’ll ask with an unusual level of excitement for a discussion of leftovers). So, shrimp and veggie stir fry with peanut sauce it is. The grain of choice tonight was whole-wheat spaghetti (brown basmati rice was the other option but we’ve had that recently, having had sushi last week).
Let me start by saying that I learned my stir fry basics from Cooks Illustrated. Years ago, when I lived with my mom in college (we’re talking 2000 or 2001 here), I began to dabble in savory cooking (desserts being my first passion). One of my favorite books was Cooks Illustrated’s Complete Book of Poultry. One of the many highlights of this book is their chapter on stir fry, which in addition to providing the basis for many tasty sauces, also laid out some basic steps and methods for making stir fry. From my reading of this “manual”, I learned the following two important tenants for making stir fry: 1) soak your protein in a mixture of sherry and soy sauce while you prep your veggies; the flavors will penetrate the protein nicely and provide great flavor to the dish, and 2) always use the “Asian Mirepoix”: green onion, garlic and ginger; Asian stir fry without these elements just seems to lack something.
The veggie mix for tonight consisted of broccoli, sugar snap peas, yellow squash (which I probably should not have bought—it being out of season and this particular selection looking a little pale—but I love it so and could not resist), cremeni mushrooms, carrot and onion. The prep for these was fairly fast: the broccoli cut into florets, the sugar snap peas put in whole, the squash halved lengthwise and then sliced, the cremeni mushroom wiped clean and sliced, the carrot cut into matchsticks and the onion halved and then cut into long strips. And the Mirepoix: I chopped about 6 green onions, reserving the greener-parts for a last minute garnish and using the whites and middle-greens for the Mirepoix; I peeled the ginger and grated it on a mircoplane (I could have diced it, but sometimes it can be a little fibrous and I was feeling both lazy and rushed—plus that tool is just the best) and about 7 (yes, 7) cloves of garlic, chopped in a totally sloppy fashion (but I’m adding them early, so they’ll practically liquefy).
While I did the prep and the shrimp soaked in their flavor bath, the pasta cooked on the stove. I would estimate that it was about 3 ounces of whole-wheat spaghetti; it doesn’t sound like much, but in the past when I’ve added what looks like 2 people’s servings of pasta to this dish, it was just too much. As I said to Jim when we agreed on the pasta amount (not wanting him to feel shorted by the amount of pasta I added, I did seek a stamp of approval on the portion): the dish is not about the pasta—it’s really about the shrimp and veggies and the pasta is a backdrop (similarly, if we served it with rice, the rice would be an accompaniment rather than a central player).
I find it to be a stress saver to have the sauce that will ultimately adorn the meal ready before the actual cooking of the meat and veggies begins. That way, at the second when you determine that you’re ready to add it, it’s there: no scrambling while the other elements of your meal overcook on the stovetop. To make the sauce, I combined about ¼ cup of the hot water from the pasta with about 2 T of natural chunky peanut butter (no hydrogenated oils or added sugars here, thank you) and about 1 T of sweet white miso. I stirred this mixture vigorously until it formed a homogenous mixture. Then, I added a dash of soy sauce (1 T?), chili-garlic paste (2 t?), hoisin sauce (1 t?), sherry (2 T?) and seasoned rice wine vinegar (1 t?). I stirred it up and we were ready to roll.
Ready to start the final dish prep. I pulled the tails off of the shrimp (missing a couple—one I found while they were cooking and Jim spotted one while the cooked shrimp waited to rejoin the stir fry). I had heated a pan with a very light spray of olive oil; I added them to the hot pan, and stirred frequently until they were curled and pink. At this stage, it is not vital that they are cooked through; I will remove them from the pan and let them sit while the veggies cook and they will get added back in toward the end with the sauce and allowed to finish cooking at that point. When they were ready, I pulled them and added the onions to the soy sauce-sherry-shrimp juice mixture that was left behind in the pan.
Over high heat, I cooked the onions, adding chicken broth as necessary to prevent burning (low fat cooks best friend—broth). Once the onions were softened, I added the mushrooms; these two things get cooked first and longest because I think that they offer the most flavor when cooked well. As I said before, I cannot eat raw onions—but the browned onions also give a nice sweet flavor to the dish, so it’s not just because of my fussy digestive system that I cook them well in this dish. The mushrooms, when well browned also impart a great deal of flavor; they give up their juices to the dish as they cook and those liquids lend much to the final product (in my opinion). When the onion and mushroom were properly browned, I added the Mirepoix and smashed the garlic and ginger into the center of the pan with my wooded spoon (shout-out to Cooks Illustrated on that one, for sure). Before the garlic could burn, I added the remaining veggies and some chicken broth. I covered the pan and allowed the veggies to steam (and here I depart from Cooks Illustrated: they do a true stir fry; I stir fry my protein, onion and mushroom, but choose to steam my veggies—a way to avoid the use of excess oil and get crisp vegetables). When the veggies were looking just underdone, I added back the shrimp, added the pasta and the prepared sauce. I stirred it around, recovered the pot and allowed it to cook a couple of minutes more until the veggies were tender-crisp. Seeing that the sauce looked a bit loose, I added a slurry of about 1 t cornstarch and 1 t water, allowed the sauce to come back to a boil and let the boil go gently for a couple of minutes to allow the cornstarch to perform it’s magic.
Almost ready to eat: now, just a garish of the remaining green onions and about ¼ cup of chopped cilantro (with extra reserved for individual sprinkling). At the last minute I chopped up some unsalted roasted peanuts for individual garnish, and we were done. Home by 8:10, eating by 9:10. And a damn fine meal, if you ask me. We know exactly what we’re eating (as opposed to ordering take out), and we’re getting high quality protein, nicely cooked veggies (read: not cooked to death) and whole grains. Man, I love getting home “early”. Now, to jam down this dinner in a race to get to bed by 10 (good luck) so I can be up in 6 ½ hours. See why I love Saturday so much? Good night.
Monday, March 5, 2007
Crab Cakes a Go-Go
Wednesday morning is one of my favorite “reading” material days: three of the local grocery stores publish their specials and the Post publishes the Food section. While I rarely shop at Giant or Safeway anymore, since they don’t tend to carry they types of food that I am likely to buy (and when they do, it’s “premium” in their stores and the price it as such), I still scour their circulars each week. Maybe it’s force of habit, curiosity, food lust, or just a cheap chick looking for a good deal. Last Wednesday, I found it. Half price crab meat at Giant. Someone is having crab cakes, very soon. Of course, Giant publishes their specials on Wednesday, but they don’t go into effect until Friday. Visions of crab cakes danced in my head for the remainder of the week.
Crab cakes were on the “menu” of options I presented to Jim for Saturday night’s meal, but did not make the cut. No bother; I’ll slip them in somewhere. We had plenty of leftover couscous from last night’s meal, and Jim (in his own words) is not “a big fan of leftovers”. He doesn’t seem to mind them quite as much if I can recreate said leftovers into something seemingly totally new. So…couscous-from-last-night stuffed bell peppers were born.
So, that was the Sunday night menu; nothing too difficult or time consuming to prepare, and nothing so heavy that I’d wake up the next morning feeling like death. Crab cakes, couscous-stuffed bell peppers, roasted asparagus with carrots and green beans, and roasted parsnips and turnips (those made it in because they’ve been in the fridge for a while and needed to be used—they’re light and tasty and make a fine addition to any meal).
Ok, you’re saying, Mrs. “Healthy cook”: crab cakes? That’s indulgent fare. Not mine. I’ve never been a fan of mayonnaise, and don’t use it when I can avoid it. The binders that I use in my cakes are just whole wheat bread, egg white, Dijon mustard and a dash of low-fat sour cream. And, I bake them on a baking sheet sprayed with olive oil. No frying, no excess amounts of oil. Just crabby-goodness.
We decided that Sunday night would be a beer-night, and so I have two tastings to report. We got started on #1 while I began my prep work.
Koningshoeven Quadrupel Trappist Ale (10% ABV): The aroma was light, with a malt presence and possibly some fruit. There was some light lacing around the edge of the glass, with very little head. On drinking it, we found it to be very well carbonated (as one would expect from a Belgian beer—even though this is a Trappist brewer based in the Netherlands). There is definitely a yeasty flavor, with a sweet malt as well. Overall, quite refreshing and tasty. We agreed that it was superior to some of the other quadruples that we have had in the past.

With drink in hand, I started on the crab cakes. Crab cakes are simple fair, but so tasty and such a treat. I began with a 16 ounce package of “special” crab meat, which I gather is a mixture of backfin, claw and lump. I bought a package of the lump crab meat, but at $10 (that’s half price), we decided to reserve it for another occasion. After picking the meat over for shells and cartilage, I added the following: about 5 scallions, sliced (green and white parts); ½ cup chopped fresh parsley; 1 clamshell package of dill, minced (which probably turned out to be 1 T); ¼ t onion powder, ¼ t garlic powder (I know—onion powder and garlic powder? I’ve discovered that these really add a great flavor punch, and are very useful even though they seem like sacrilege); ¼ t celery salt; a few dashes of Worcestershire sauce; about 2 ½ slices of whole wheat bread, diced into very small “crumbs”; 1 T light sour cream, 2 t country Dijon mustard; 2 egg whites; ½ t thyme; and the greater part of a red bell pepper, finely diced. I mixed all of this together and, after ascertaining that the mixture would indeed form cohesive patties, I shaped them and then tossed them in some panko breadcrumbs (first time I’ve done that; the intent was to give the cakes that crunchy exterior that you might get from sautéing them or frying them—seems to have worked in the end). Onto the baking sheet and ready for the oven.
The first time I made crab cakes, I embarked on a full-scale fact finding mission in search of the ultimately perfect recipe. I had decided that I wanted to make them at home and, while I had them in restaurants countless times, I had really no clue what actually went into those little wonders of luscious crab. I started with a recipe from Eating Well magazine, a wonderful publication devoted to healthful eating. Seeing what they used for binders (if my memory serves me correctly, they called for light mayonnaise, 1 whole egg and one egg white), I then proceeded to look up crab cakes in every source I could find. I tore apart my cookbook collection and scoured the internet. The purpose of this search was to find out, in general: just what do people put in these things? The result of all this searching is what I listed above; I decided on my spice mixture based on a comprehensive survey of (probably) at least 20 crab cake recipes. I axed the light mayonnaise and egg yolk suggested by Eating Well, opting instead for an extra white and less-offensively flavored light sour cream (and not much of it). And LMF crab cakes were born. It would seem like I have a lot of time on my hands—truth is, I really don’t. I just don’t sleep much.
The couscous was pretty simple also. That’s the beauty of taking a left over side dish and making a new side dish out of it—not much work involved. Recycled food, if you will. I had one red, one yellow and one orange bell pepper, from which I removed the tops and as much as the ribs and seeds as my little fingers could reach from the holes I cut in the tops. I filled them about halfway with the leftover couscous, added a few diced tomatoes in the center (just to add a little moisture, so the couscous wouldn’t dry out). I filled the rest of the pepper with the couscous, topped each one with a slice of plum tomato and a sprinkle of feta cheese (Greek sheep’s milk feta from Trader Joe’s—good quality and a great price; often the sole reason for my trips there, but I always find a few extra things to buy). Into a small loaf pan they go, and ready for the oven.

As usual, roasted veggies. I’m not too creative with veggies, unfortunately, but I find that roasting them with some kind of flavorful splash usually produces good results. After all, it gets Jim to eat his veggies. Asparagus was on sale at Whole Foods (first sign of spring?), so that was the star. I added some carrots and grape tomatoes for color, some defrosted artichoke hearts, and also the last of the fresh green beans that I bought for yesterday’s dinner. Some garlic powder and onion powder (dinner prep was fast tonight---no fresh garlic in sight….gasp! Bad lazy cook!), 1 T of yellow mustard seeds, 1 t herbs de provence, 1 T balsamic vinegar, pepper and some red pepper flakes. Also a good splash of chicken broth, to keep some moisture in there and prevent burning (where most people would probably use oil--low fat cooking, folks). Now, a toss to mix everything up and ready for the oven.
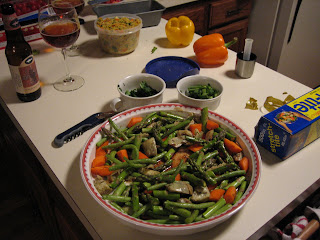
We had some parsnips and turnips in our veggie drawer that were probably getting close to being old, so I decided to add a fourth dish to our supper. I peeled them, diced them small (those turnips are deceiving; the look like carrots and you wouldn’t think that they take forever to cook and are not at all pleasant when they’re even slightly undercooked—when they are undercooked, they’re tough and gritty, but they’re tender and sweet when cooked properly). A dash of soy sauce, some garlic and onion powder (I know, I know—Bad lazy cook!), some pepper and ready for the oven.
Everyone in the pool…or the sauna? 400 degrees, and all of these pans barely fit. As the dinner cooked away, we broke into our second beer.
The Burton Baton from Dogfishead Craft Brewery. Described on their website as “A blend of oak-aged English strong ale and our 90 Minute I.P.A.. Citrus notes from Northwestern hops meld with vanilla notes from the oak”, and clocking in at 10% ABV. It had a mildly hoppy aroma, with a touch of sweetness. In the taste, you could definitely pick up some oak and Jim thought maybe a touch of smoke. I felt that it left a slight tingle on the tongue in the finish. A nicely balanced beer, with good hop flavor but a pleasant dose of malts as well. Very refreshing (and served in the DFH “tasting” glasses that I got Jim for Christmas—who on earth calls a 16 oz. glass a taste, I’m not sure. DFH, apparently).

Elements of dinner slowly emerged from the oven and waited patiently, covered in aluminum foil, for the slow members of the group to finish up. The bread crumbs on the outside of the crab cakes were not browning quite as much as I had wanted, so I cranked up the heat to broil and moved the rack up to the second-from-the-top position. I let them broil for about 5 minutes to get a nice golden brown and then we were ready to eat. You can see the final plated meal below (again, side salad served but not pictured).Well, that was Sunday night. Now we start a new week, with much more meager meals to be had in that period. Monday night will consist of leftovers (3 crab cakes are left, 1 ½ stuffed peppers and some roasted veggies), which is just as well because I’ll be home late. Now, to dream about what to make next weekend…

Sunday, March 4, 2007
Saturday night—finally
Saturday night—finally. We decided on eastern Mediterranean for tonight. I provided Jim with a “menu” of options earlier in the week, and we finally decided on the eastern Mediterranean option for tonight. This meal was originally supposed to include a lamb meatloaf, but that seemed a bit rich for tonight. I convinced him to go for fish instead (a fairly lean fish, too—Halibut; score 1 for Lesley).
Our evening menu consisted of:
As an appetizer: Baba ganoush, with toasted pita bread (purchased), and assorted vegetable crudités
For the meal: Halibut steamed atop onions and mushrooms, with a tomato-green olive salsa; whole wheat couscous with figs, almonds, and chickpeas; roasted green beans, cherry tomatoes and cauliflower in a Dijon balsamic mixture
Ok, so the veggies aren’t too eastern Mediterranean, but balsamic and country Dijon mustard are so good on roasted veggies, that I couldn’t help myself (side note here: two years ago, I wouldn’t have eaten vinegar or mustard for all the beer in Belgium, but now I’m what Jim calls a “mustard nut” and I can tolerate certain types of vinegar—but straight white wine vinegar still makes me want to gag).
So, with the menu set, we were off to start the evening. As I began my prep work (you can see the stack of veggies waiting to be cut on the counter behind me in the picture below—it’s satisfying to slowly see that pile get smaller and smaller), we began our beer tasting for the night.
 Tasting victim #1: the Red & White from Dogfishead Craft Brewery. The brewery describes this beer as “A big, belgian-style Wit brewed with coriander and orange peel and fermented with Pinot Noir juice. After fermentation a fraction of the batch is aged in Oregon Pinot Noir barrels, and another fraction is aged on oak staves. The beer is blended together before packaging.” We split the 750 mL bottle, which clocks in at 10% ABV (not the strongest beer we’re likely to drink, but not the weakest either).
As you can see in the picture below, the color has a ruby tone. There was a sweet aroma, with maybe a hint of grape or wine (which makes sense, given that they added grape juice and aged a portion of it in Pinot Noir barrels). It has the effervescence of a Belgian beer, and the light taste of a wit. The grape juice clearly lends a fruity, winey flavor and there is a hint of tannins in the dry finish. Overall, a tasty beer—nothing either of us would say is terrible (yes, we’ve had a few of those), but probably not worth the $12.99 paid. If it was $6.99 a bottle, maybe. $12.99? Maybe not. Hey, I’m frugal—what I can I do.

As we wrapped up beer #1, the eggplant and garlic head were almost done roasting in the oven. So, I took a break from my other prep work, and proceeded to prepare the Baba ganoush. I roasted an entire eggplant (about 35 minutes at 400) and a head of garlic (wrapped in foil, same temperature and amount of time). After allowing the eggplant to cool a bit, I peeled the skin off (easy as pie after it’s been roasted to hell) and coarsely chopped the flesh. I freed the roasted garlic of it’s skins and added most of the head to the eggplant (after chopping it a bit; it’s so soft at that point that there’s little to do), reserving a couple of the fragrant roasted cloves for the tomato-green olive salsa that would later adorn our fish. I mixed the juice of one lemon with about 2 T of tahini paste. When that was blended, I added it to the eggplant, along with about ¾ t ground cumin, ½ t ground coriander and 1 T fresh mint. I topped it with two chopped plum tomatoes, a dash of sweet Hungarian paprika and some additional chopped parsley. I set it aside (on the counter away from Jim, so he wouldn’t touch it yet) to allow the flavors to meld while I toasted up some pita and cut the crudités. As I mention below, I used a recipe in a book as a starting point. However, I feel that I made enough additions and subsitutions (including all of the spices added--it seemed odd to me to make this dip without cumin) that I feel fairly comfortable calling it my own at this point (since it would have tasted quite different if I actually followed the author's instructions).
Jim, who has never had baba ganoush, gave it a rave. He continued to eat it while I charged ahead with the remaining prep work.
Now, a word about garlic. I said before; I love garlic—can’t get enough of it. That being said, I cannot eat raw garlic. When I decided to make baba ganoush, I looked up some recipes, and settled on one as one as my general guide. The author called for cloves of raw garlic to be added, and this dish is not cooked. I’ve been taught the lesson by my upper GI track that I cannot eat raw garlic or raw onions; I’ll be burping all night and miserable as hell. But, the oven’s on at roasting temperature anyway (for the eggplant), so why not roast a whole head and add that? (the original recipe called for 3 cloves of fresh garlic to 2 entire eggplants; I have one eggplant and I’m adding a whole roasted head—but the roasting mellows the flavor to a great extent, making it almost sweet). What is the total garlic load in our meal when you consider the head of roasted garlic that kicked off the evening? About 2 and a half heads of garlic. See the gigantic pile of whole peeled cloves of below and see them after they’ve been pulverized in my garlic press.
Ok, the garlic press. Probably a controversial issue for those who are into cooking. There is a time for sliced garlic, whole garlic, roughly chopped garlic…but sometimes you want a fine mince (for maximum flavor release and also when the dish won’t cook long enough for large chunks to melt down). If it were three cloves, I would do it by hand—no question. I’m painfully ultilitarian and, even though Jim is kind enough to do most of the dishes, I really hate to dirty something if it won’t get much use (my knife is already dirty, why not just use that?). But how many cloves are there, like 16 to 20? We want to eat tonight…time to pull out the press. I received this for Christmas from Steve and Sue (hi!), and it is just the best. It makes the one that I used to have seem ridiculous. And, it allowed me to infuse our meal with garlic heaven without having to spend 15 minutes mincing garlic by hand. Ahh, technology.


After finishing my garlic duty, we noticed that our glasses were oddly dry (heavens no!), so onto….
Tasting victim #2: Samichlaus from Castle Brewery in Eggenberg, Austria. Oh, the Samichlaus; it’s an evil master. I’m calling this a tasting, but we’ve had this before; a couple of times. Once, we were out with friends and had a few of these (as well as some other selections) and it hit us all like a ton of bricks—one of those nights where you’re not really sure how you made it home, but you’re so thankful that you did and you resolve to never allow that to happen again.
This beer is a strong one: 14% ABV. The aroma is sweet, with a light maltiness; we couldn’t quite put our finger on it, but we thought it was a note of butterscotch or caramel. In the taste, the alcohol is apparent but still pleasant; it’s not overpowering and you don’t feel like you’re drinking liquor (which often is the case with the high ABV beers that aren’t heavily hopped). There’s malt up front in the taste and malt all the way through; while there are surely hops in the beer, you wouldn’t know it from the taste—it’s malt heaven. This is one that falls into the dangerously drinkable category, as Mike and Andrea (partners in crime in what has come to be known as “the Samichlaus night”) can certainly attest.

Now, for the main event. I marinated the fish in a mixture of fresh orange juice, onion, minced garlic, orange zest, about 1 T anise seeds, about 1 t dried oregano and about ½ cup of dry sherry. The salsa to go on top consisted of two chopped plum tomatoes, about 10 chopped Greek green olives (I don’t know much about green olives, because I use kalamata and nicoise most often; I got these at the Whole Foods olive bar from a batch labeled “Greek olive mix”. I aimed for the green ones; presumably these are some type of green Greek olive, but I have no earthly clue what kind they are). I added 1 to 2 T chopped fresh dill, the remaining cloves of roasted garlic, about 1 T of chopped fresh mint and a splash of balsamic vinegar. And just a dash of salt. I set it aside and let the flavors meld.
To cook the fish, I slowly cooked some sliced onions in a medium sauté pan. When they were well softened, I added some sherry, minced garlic, about ½ t ground cumin and about ¼ t ground coriander. I placed some cleaned whole cremini mushrooms over top of the onions and added a bunch of chicken broth to the pan. I placed the fish atop the mushrooms, increased the heat, covered the pan and allowed the fish to steam, with a sprinkle of cinnamon on top. You can see the final product below, with a garnish of the salsa and some parsley and mint sprinkled on top.

The whole wheat couscous began with a chopped sweet yellow onion (my standard cooking onion) and about 4 large carrots, peeled and chopped. I sautéed them in some chicken broth (avoiding excess oil here—low fat cooking, folks). After they were well softened, I added about 6 minced cloves of garlic (who really knows how much, since I took it from the whole-custard-cup of garlic that I had for the meal), ½ t cumin, ½ t ground ginger, ½ t ground coriander, 1/4 t cinnamon and ¼ t turmeric. And some sherry, because everything needs to have sherry in it. I also added a can of chickpeas that had been drained and rinsed. After letting this sauté for a bit, I added 2/3 cup of chicken broth, about ¼ cup chopped dried figs and ¾ cup of whole wheat couscous. I gave it quick stir, put the lid on and removed it from heat. After about 5 minutes, I added about ½ c of chopped fresh mint, about 2 T chopped fresh parsley, 1 peeled and diced nectarine and about ½ cup of sliced almonds. Ready to serve.
The veggies were easy, and although I mention them last, they were the first thing to get going (since they bake in the oven and take a while). They were pretty simple: trimmed fresh green beans, a head of cauliflower, and about ¾ cup of cherry tomatoes thrown into a baking pan. I added about 1/4 cup of chopped onion, about 3 cloves of minced garlic (again, who knows because I got it from the custard cup garlic bank), about 2 T balsamic vinegar and about 2 T of country Dijon mustard (you know, with the mustard seeds in it—yum.) I also added some fresh dill and after they emerged from the oven, tossed in some spring onions and the parsley I had left from other dishes.
And you can see the final product of these efforts below. (Side salad not pictured—I must have salad with dinner, but it didn’t make the photo).

And we should not forget…
Tasting vitim #3: The 90-minute IPA from Dogfishhead Craft Brewery. Ok, another DFH; what can we say, we’re on kind of a kick. We’re not fans of really hoppy beers, and therefore usually avoid anything labeled as an IPA. But, we recently discovered the subset of IPAs knows as “imperial” or “double” IPAs. These have a noticeable hop presence, but it is usually well balanced by a strong malt profile. Which leads to some very complex beers—you can really enjoy the aromas and subtle flavors of the hops without feeling like you’re sucking on a lemon (some ultra-hoppy beers can just be too damn bitter; like Stone’s Arrogant Bastard, which in my opinion is probably the result of some bet between brewers as to how much hops you can really add—hops for the sake of hops is no fun for the taste buds).
This beer had a grassy aroma, with some citrus; it’s definitely the hops you’re smelling. The color is golden; the lightest colored beer we’ve had tonight. The malts balance the hops very well; the hops are dominate but gentle. Rather than bitterness, you really get the hop flavor. Some citrus and the same grassy notes that came through in the aroma. Overall, an excellent beer. This one clocks in at 9% ABV.

So, that was the Saturday night culinary classic. Good food, good company (thanks to Jim--pictured above), good beer. And I don’t have to work tomorrow. Perfect.
We'll have the lamb meatloaf soon, I promise ;)
Our evening menu consisted of:
As an appetizer: Baba ganoush, with toasted pita bread (purchased), and assorted vegetable crudités
For the meal: Halibut steamed atop onions and mushrooms, with a tomato-green olive salsa; whole wheat couscous with figs, almonds, and chickpeas; roasted green beans, cherry tomatoes and cauliflower in a Dijon balsamic mixture
Ok, so the veggies aren’t too eastern Mediterranean, but balsamic and country Dijon mustard are so good on roasted veggies, that I couldn’t help myself (side note here: two years ago, I wouldn’t have eaten vinegar or mustard for all the beer in Belgium, but now I’m what Jim calls a “mustard nut” and I can tolerate certain types of vinegar—but straight white wine vinegar still makes me want to gag).
So, with the menu set, we were off to start the evening. As I began my prep work (you can see the stack of veggies waiting to be cut on the counter behind me in the picture below—it’s satisfying to slowly see that pile get smaller and smaller), we began our beer tasting for the night.
Tasting victim #1: the Red & White from Dogfishead Craft Brewery. The brewery describes this beer as “A big, belgian-style Wit brewed with coriander and orange peel and fermented with Pinot Noir juice. After fermentation a fraction of the batch is aged in Oregon Pinot Noir barrels, and another fraction is aged on oak staves. The beer is blended together before packaging.” We split the 750 mL bottle, which clocks in at 10% ABV (not the strongest beer we’re likely to drink, but not the weakest either).As you can see in the picture below, the color has a ruby tone. There was a sweet aroma, with maybe a hint of grape or wine (which makes sense, given that they added grape juice and aged a portion of it in Pinot Noir barrels). It has the effervescence of a Belgian beer, and the light taste of a wit. The grape juice clearly lends a fruity, winey flavor and there is a hint of tannins in the dry finish. Overall, a tasty beer—nothing either of us would say is terrible (yes, we’ve had a few of those), but probably not worth the $12.99 paid. If it was $6.99 a bottle, maybe. $12.99? Maybe not. Hey, I’m frugal—what I can I do.
As we wrapped up beer #1, the eggplant and garlic head were almost done roasting in the oven. So, I took a break from my other prep work, and proceeded to prepare the Baba ganoush. I roasted an entire eggplant (about 35 minutes at 400) and a head of garlic (wrapped in foil, same temperature and amount of time). After allowing the eggplant to cool a bit, I peeled the skin off (easy as pie after it’s been roasted to hell) and coarsely chopped the flesh. I freed the roasted garlic of it’s skins and added most of the head to the eggplant (after chopping it a bit; it’s so soft at that point that there’s little to do), reserving a couple of the fragrant roasted cloves for the tomato-green olive salsa that would later adorn our fish. I mixed the juice of one lemon with about 2 T of tahini paste. When that was blended, I added it to the eggplant, along with about ¾ t ground cumin, ½ t ground coriander and 1 T fresh mint. I topped it with two chopped plum tomatoes, a dash of sweet Hungarian paprika and some additional chopped parsley. I set it aside (on the counter away from Jim, so he wouldn’t touch it yet) to allow the flavors to meld while I toasted up some pita and cut the crudités. As I mention below, I used a recipe in a book as a starting point. However, I feel that I made enough additions and subsitutions (including all of the spices added--it seemed odd to me to make this dip without cumin) that I feel fairly comfortable calling it my own at this point (since it would have tasted quite different if I actually followed the author's instructions).
Jim, who has never had baba ganoush, gave it a rave. He continued to eat it while I charged ahead with the remaining prep work.
Now, a word about garlic. I said before; I love garlic—can’t get enough of it. That being said, I cannot eat raw garlic. When I decided to make baba ganoush, I looked up some recipes, and settled on one as one as my general guide. The author called for cloves of raw garlic to be added, and this dish is not cooked. I’ve been taught the lesson by my upper GI track that I cannot eat raw garlic or raw onions; I’ll be burping all night and miserable as hell. But, the oven’s on at roasting temperature anyway (for the eggplant), so why not roast a whole head and add that? (the original recipe called for 3 cloves of fresh garlic to 2 entire eggplants; I have one eggplant and I’m adding a whole roasted head—but the roasting mellows the flavor to a great extent, making it almost sweet). What is the total garlic load in our meal when you consider the head of roasted garlic that kicked off the evening? About 2 and a half heads of garlic. See the gigantic pile of whole peeled cloves of below and see them after they’ve been pulverized in my garlic press.
Ok, the garlic press. Probably a controversial issue for those who are into cooking. There is a time for sliced garlic, whole garlic, roughly chopped garlic…but sometimes you want a fine mince (for maximum flavor release and also when the dish won’t cook long enough for large chunks to melt down). If it were three cloves, I would do it by hand—no question. I’m painfully ultilitarian and, even though Jim is kind enough to do most of the dishes, I really hate to dirty something if it won’t get much use (my knife is already dirty, why not just use that?). But how many cloves are there, like 16 to 20? We want to eat tonight…time to pull out the press. I received this for Christmas from Steve and Sue (hi!), and it is just the best. It makes the one that I used to have seem ridiculous. And, it allowed me to infuse our meal with garlic heaven without having to spend 15 minutes mincing garlic by hand. Ahh, technology.
After finishing my garlic duty, we noticed that our glasses were oddly dry (heavens no!), so onto….
Tasting victim #2: Samichlaus from Castle Brewery in Eggenberg, Austria. Oh, the Samichlaus; it’s an evil master. I’m calling this a tasting, but we’ve had this before; a couple of times. Once, we were out with friends and had a few of these (as well as some other selections) and it hit us all like a ton of bricks—one of those nights where you’re not really sure how you made it home, but you’re so thankful that you did and you resolve to never allow that to happen again.
This beer is a strong one: 14% ABV. The aroma is sweet, with a light maltiness; we couldn’t quite put our finger on it, but we thought it was a note of butterscotch or caramel. In the taste, the alcohol is apparent but still pleasant; it’s not overpowering and you don’t feel like you’re drinking liquor (which often is the case with the high ABV beers that aren’t heavily hopped). There’s malt up front in the taste and malt all the way through; while there are surely hops in the beer, you wouldn’t know it from the taste—it’s malt heaven. This is one that falls into the dangerously drinkable category, as Mike and Andrea (partners in crime in what has come to be known as “the Samichlaus night”) can certainly attest.
Now, for the main event. I marinated the fish in a mixture of fresh orange juice, onion, minced garlic, orange zest, about 1 T anise seeds, about 1 t dried oregano and about ½ cup of dry sherry. The salsa to go on top consisted of two chopped plum tomatoes, about 10 chopped Greek green olives (I don’t know much about green olives, because I use kalamata and nicoise most often; I got these at the Whole Foods olive bar from a batch labeled “Greek olive mix”. I aimed for the green ones; presumably these are some type of green Greek olive, but I have no earthly clue what kind they are). I added 1 to 2 T chopped fresh dill, the remaining cloves of roasted garlic, about 1 T of chopped fresh mint and a splash of balsamic vinegar. And just a dash of salt. I set it aside and let the flavors meld.
To cook the fish, I slowly cooked some sliced onions in a medium sauté pan. When they were well softened, I added some sherry, minced garlic, about ½ t ground cumin and about ¼ t ground coriander. I placed some cleaned whole cremini mushrooms over top of the onions and added a bunch of chicken broth to the pan. I placed the fish atop the mushrooms, increased the heat, covered the pan and allowed the fish to steam, with a sprinkle of cinnamon on top. You can see the final product below, with a garnish of the salsa and some parsley and mint sprinkled on top.
The whole wheat couscous began with a chopped sweet yellow onion (my standard cooking onion) and about 4 large carrots, peeled and chopped. I sautéed them in some chicken broth (avoiding excess oil here—low fat cooking, folks). After they were well softened, I added about 6 minced cloves of garlic (who really knows how much, since I took it from the whole-custard-cup of garlic that I had for the meal), ½ t cumin, ½ t ground ginger, ½ t ground coriander, 1/4 t cinnamon and ¼ t turmeric. And some sherry, because everything needs to have sherry in it. I also added a can of chickpeas that had been drained and rinsed. After letting this sauté for a bit, I added 2/3 cup of chicken broth, about ¼ cup chopped dried figs and ¾ cup of whole wheat couscous. I gave it quick stir, put the lid on and removed it from heat. After about 5 minutes, I added about ½ c of chopped fresh mint, about 2 T chopped fresh parsley, 1 peeled and diced nectarine and about ½ cup of sliced almonds. Ready to serve.
The veggies were easy, and although I mention them last, they were the first thing to get going (since they bake in the oven and take a while). They were pretty simple: trimmed fresh green beans, a head of cauliflower, and about ¾ cup of cherry tomatoes thrown into a baking pan. I added about 1/4 cup of chopped onion, about 3 cloves of minced garlic (again, who knows because I got it from the custard cup garlic bank), about 2 T balsamic vinegar and about 2 T of country Dijon mustard (you know, with the mustard seeds in it—yum.) I also added some fresh dill and after they emerged from the oven, tossed in some spring onions and the parsley I had left from other dishes.
And you can see the final product of these efforts below. (Side salad not pictured—I must have salad with dinner, but it didn’t make the photo).
And we should not forget…
Tasting vitim #3: The 90-minute IPA from Dogfishhead Craft Brewery. Ok, another DFH; what can we say, we’re on kind of a kick. We’re not fans of really hoppy beers, and therefore usually avoid anything labeled as an IPA. But, we recently discovered the subset of IPAs knows as “imperial” or “double” IPAs. These have a noticeable hop presence, but it is usually well balanced by a strong malt profile. Which leads to some very complex beers—you can really enjoy the aromas and subtle flavors of the hops without feeling like you’re sucking on a lemon (some ultra-hoppy beers can just be too damn bitter; like Stone’s Arrogant Bastard, which in my opinion is probably the result of some bet between brewers as to how much hops you can really add—hops for the sake of hops is no fun for the taste buds).
This beer had a grassy aroma, with some citrus; it’s definitely the hops you’re smelling. The color is golden; the lightest colored beer we’ve had tonight. The malts balance the hops very well; the hops are dominate but gentle. Rather than bitterness, you really get the hop flavor. Some citrus and the same grassy notes that came through in the aroma. Overall, an excellent beer. This one clocks in at 9% ABV.
So, that was the Saturday night culinary classic. Good food, good company (thanks to Jim--pictured above), good beer. And I don’t have to work tomorrow. Perfect.
We'll have the lamb meatloaf soon, I promise ;)
Saturday, March 3, 2007
Welcome! I am Lesley, a 20-something living in Northern Virginia who toils in an office job by day (and early evening), and spends nights and weekends indulging my passion for cooking and healthful eating. My fiancé, Jim, serves as a willing subject to my kitchen adventures, but doesn't seem to mind.
In my view, the key to healthy eating is variety (after all, it is the spice of life, right)? Who wouldn't be swayed by the food temptations that surround us (in dizzying quantities) if they weren't fully satisfied with what they could eat at home? I've found over time that by eating a wide variety of foods at home, cooked using various techniques and in the style of many different cuisines, that I prefer to eat at home and find restaurant foods to be less-than-satisfying (except in the sense that you leave so full that you feel like you have a brick in your stomach). Sushi, however, is one exception, which I'm sure I'll get to later (probably good that we go out for anymore). If a person were confined to brown rice and broccoli for dinner each night, they would naturally have cravings for other foods. But, if instead of going for fast food (for example), what if you swapped out quinoa for the rice (and added different flavorings) and tried some new veggies (in different methods of preparations and with new flavorings). It's a great mental exercise to keep things new this way, and it adds much excitement to home eating. As a couple, we hardly ever eat out any more. On our ideal Saturday night, I prepare the meal that I've planned while we share some fine craft beer (more on that later, too) and catch up after a soul-crushing week of office work. It's quality time and good healthy food (and fine craft beer, hmm).
So, the name of this blog is the healthy home chef. I am no chef. I am a self-taught and very passionate home cook who loves food and who also has a great interest in healthful eating. On this blog, I intend to post the highlights of our culinary adventures, some recipes (when I actually write down what I’ve done—I’m notorious for not documenting some of my greatest kitchen-triumphs) and general information and tidbits pertaining to food, food shopping, etc.
What types of recipes and food-chatter are you likely to find here? Lets see:
I fill our menu with whole grains and a wide variety of vegetables. I stick with lean meats (avoiding beef, not only because of the high saturated fat content, but also just because I find that I really don’t enjoy the flavor much anymore—I find buffalo to be much more tasty), and I adore seafood (if it was up to me, we’d eat seafood every day—I haven’t gotten Jim to agree to that one yet). And, I love to dabble in various cuisines, my favorites being Greek (owing to my lineage, half greek), Provincial French, Asian (Japanese and Chinese in particular—I haven’t done much Thai or Korean, but would like to) and Mexican (who doesn’t like Mexican). And I LOVE garlic. When I have time to cook every night, I probably go through 10+ heads of garlic a week (heads, not cloves). Every meal I cook probably has at least one entire head of garlic in it; it’s kind of a house joke now (“what, no garlic?”). So, that should give you some indication of what you’re likely to find here, once I get off my rear and start posting some actual content.
Having said all of that jazz about healthy eating…now to my indulgences. Beer, cheese and sweets.
Beer: Jim and I are craft beer fans. We read much about beer styles, do a little brewing of our own, and enjoy seeking out new and unusual beers to examine and compare with other beers. Beer is very much a part of our weekend food life, as we often have a little tasting while I prepare our weekend meals (little sometimes not being so little). So you’re also likely to hear a lot about craft beer here, too.
Cheese: ahh, cheese. Whole foods must be the most wonderful place on earth, with such a wonderful cheese selection. I often come home from the grocery store with “treats” for Jim (like candy if you had a child—but we have no children so we always joke that I’ll “mother” him instead), and they often involve some new kind of cheese that we’ve never had before (or, predictably enough, some kind of beer that we’ve never had before). But, being the healthy chef, I view cheese as an indulgence. If a dish calls for cheese as a primary ingredient, chances are that I’ll either use a lower fat cheese, or a cheese so flavorful (like a parmesan-reggiano or a Roquefort) that you don’t have to use much. Other, full fat cheeses are reserved for nibbling and tasting with beer or wine.
Sweets: Here, I really have a problem. I’m a little girl (5’2’’ and under 100 lb.; people wonder how, after they see how I eat and drink), but I swear that if you put a chocolate layer cake in front of me, I could take down the whole thing. If I finish one dessert, I immediately want 10 more. My first adventures in cooking were focused on baking and desserts (having become somewhat acclaimed among family members and certain co-workers for my cheesecakes). But, then I read about nutrition and the like and realized what eating that sort of stuff with regularity can do to you. Ouch. So, I rarely eat sweets out (because I know that they’re probably filled with butter and, even worse, partially hydrogenated oils, and lots of refined sugars). Instead, I make treats for us at home and try to use healthful oils (sparingly, still), alternate sweeteners (brown rice syrup for one), and whole-wheat flours (and other whole grain ingredients—oat flour, quinoa flour, etc.). These treats still pack a caloric punch, so you can’t go-to-town, but it’s not as bad as it could be. So, you’re likely to see some content related to slightly-more-healthful desserts in these posts as well.
Wow, that was a long first rant. So, welcome! I hope that you enjoy reading my blather as much as I enjoy posting it. Cheers!
Subscribe to:
Posts (Atom)