Saturday, July 30, 2011

Eggplant Parmesan, done a bit lighter

I’m back, finally - it’s been a while. In some ways, much has changed; in other ways, very little has changed. A few years have passed, jobs have changed (many times for me) and a few pounds have been gained by both of us. As for me, I estimate about 20 – 10 of which I needed to gain, the other 10ish of which are sort of pissing me off at the moment. My love of beer, cheese and (low fat) ice cream is strong and unwavering, and I’ve gradually become more lax on things like red meat, full fat cheese and baking up treats in the past years. Jim suffers from the same trouble as most folks: he enjoys food – maybe in slightly too large of portions at times – and is not a fan of exercise (he said a few months ago that he “hates” it – but I think he was just trying to hurt my feelings; I love exercise). I try to keep us on a good track, but we do enjoy a few tasty delights that are not the healthiest from time to time. But, we’re happy – probably the happiest we’ve been in a long time.

I try to keep us on dietary track while also engaging in some fun-loving food activity. In keeping with that attitude, Friday night’s dinner was a slightly healthier eggplant parmesan. It’s basically the same as my “indulgent” version of the dish, with the significant difference being the treatment of the eggplant. In the richer version, slices of eggplant are coated in seasoned flour, egg wash, seasoned panko breadcrumbs, and are baked (not fried, at least) until the panko is nicely toasted and the eggplant slices are cooked through. It’s not fried, so what’s the problem? It ends up being a lot of bread crumbs; the full bread coating and the egg-glue cause the dish to seem a bit heavy. It’s – pardon me - (earmuffs) fucking delicious, but not what you would call “light”. Last night, I was feeling a tad porky. So I opted for the lighter version, wherein slices of eggplant and squash are grilled before being layered into the saucy cheesy goodness that is eggplant parm. Served with whole wheat spaghetti, of course.


These veggies are from the Farmer’s Market, which is typical for us from May to November. I’m a nut about the Farmer’s Market – it’s the best thing ever. All of the vegetables and fruits are fresh and delicious, and….less expensive than the grocery store. I get beautiful heirloom tomatoes and red/yellow bell peppers for $2.50 per pound there, when I would pay at least $4-5 per pound at the grocery. Plus, the variety is great – I have never seen these types of eggplants, even at Whole Foods, and they are so much tastier than your standard globe variety. Farmer’s Market veggies win the taste test; the difference between being recently picked and hauled a short distance, versus coming from 3,000 miles away and sitting a walk-in fridge at the store for two weeks is quite apparent. I say often that the veggies from the Farmer’s Market taste more like what the vegetable is supposed to taste like (more like themselves, if that makes any sense). The flavor is more intense than what you normally buy at the grocery: they’re vegetables, plus. My wonder at this usually meets with what I interpret as an internal eye-roll from Jim (“yes, you’ve said that before. Now feed me, woman!”), but then I’ll hand him a piece of tomato that I’ve just cut and he says “Wow, that really tastes like a TOMATO!! Can I have another piece?” Uh huh. You can see from the photo above that I’m using a grill pan to “grill” the vegetables. Yes, clearly an actual grill would be preferable. If you’re going to try this recipe and have an actual grill, I fully encourage utilization of it. In our case however, there are three reasons the real grill was not used today: 1) I’m pretty sure we’re almost out of propane; 2) our kitchen is on the main floor of our townhome, and the patio with the grill is all the way in the basement (so it’s a real pain in the ass to haul our stuff all the way down there); and 3) “It’s hot outside”, says Jim (hereinafter referred to as “whiner” when the subject of outdoor heat is broached). Yes, it was 100 degrees outside today, with a heat index of 105; I can handle pretty hot weather, but Jim is not in my camp. The mere suggestion that he walk outside meets with a silent, steely eyed response.


Cheese selection is important. Most recipes would instruct use of only parmesan and mozzarella. Not in this house. Here we have a five cheese selection, with mozzarella a reluctant inclusion. Why reluctant, you ask? I generally find mozzarella to be flavorless. Yes, it melts well but so do many other cheeses that have far more flavor. If I’m going to eat something that’s basically 100% fat, it had better pack a flavor punch; melting well is not sufficient criteria for me. Just sayin’. But, Jim likes mozzarella and will argue in its defense (not a winning argument, please note), so I include it to make him happy. That’s what I do. You’ll notice in the photo that it’s the crappier bloc-version of mozzarella. Yes, I would have preferred the fresher, ball-type of cheese that comes floating in water. But, we have a couple of large expenses looming on next month’s credit card bill (badass baseball tickets for my birthday weekend –yeah!, and renewal of the maintenance plan on basically all of our appliances), so I’m feeling a bit “careful” with money of late.

The roll call of cheese, clockwise from the back: mozzarella, aged provolone (sharp, nutty, salty, packs a punch), Asiago fresco (creamy, smooth, slightly tangy, melts very well), Stravechio parmesan (it’s not Reggiano, but it’s nearly as good and about $7 cheaper per pound), and Parrano (nutty, melts well also). Cheese is important to us; even our cats have been indoctrinated.


Finally, one more note before I get to the recipe. More of a guilty admission, really. Yes, that is a jar of premade pasta sauce. I’m not proud. But it’s a weeknight and it’s expedient (I know it’s Friday and we don’t have to be up early tomorrow, but I’m beginning my cooking at 7:45 pm, and we don’t really want to eat at 10). I can’t resist the temptation to doctor it up though, as detailed in the recipe below – in fact, if you do all of those steps to a plain canned tomato product, you’ll end up with a pretty good sauce – it just requires longer cooking on the stovetop.


Grilled Eggplant Parmesan
Serves 2, with a bit of leftovers; possibly one more without leftovers


Ingredients:
3 smallish eggplant, sliced in rounds of about ½ inch thickness (enough to make 15-20 slices)
2 yellow squash – I used patty pan here, but golden zucchini or regular yellow squash will also work well (even green zucchini if you prefer)
½ of a red onion, diced
1-5 cloves of garlic - large range given because I’m a garlic nut, but I realize that not everyone loves it as I do; I probably used more like 8 last night. But I’m garlic-crazed.
5-10 cremini mushrooms, cleaned and sliced - range given because of size differential; ours last night were enormous so I used closer to 5. If they were petite I would probably go up to about 10
½ red bell pepper, chopped into small pieces
1 large tomato, half of it diced into medium pieces, the other half sliced into thin rounds
1 jar of pre-made pasta sauce
½ c red wine – I used a cabernet sauvignon
1 14 oz can of diced tomatoes (no-salt-added is preferable)
Grated cheese – any varieties you like ( I think I sufficiently beat this to death above); I used at least 2 cups, I think – use as much or as little as you like (while understanding that the “health” quotient declines dramatically as more cheese is added)
2 cups chopped herbs – I used basil and marjoram; Italian parsley also makes a nice addition, and oregano can be used in place of the marjoram
¼ chopped olives - these are Nicoise and green greek olives – use what you like, but please, nothing from a can


Method:
First, get the sauce on the stove. In the same pot that you’ll later use to boil water for pasta, heat a bit of olive oil until shimmering on medium-high or high heat (depends on your stove). Add the onion, and cook until it’s softened and turning translucent. Add about half of the chopped mushrooms; and cook until the mushroom are very soft, the onions are getting a bit of browning on their edges and some brown fond is starting form on the bottom of the pan. Add the chopped garlic, and cook for about 1 minute. Add ¼ cup of the red wine, scrapping the bottom of the pan with a wooden spoon to loosen the fond that has formed. Cook until most of the liquid has evaporated, maybe 1-2 minutes. Add the chopped tomatoes, cooking until they let out most of their juice – maybe 2-3 minutes. Add the jarred pasta sauce, can of diced tomatoes, remaining wine, remaining chopped mushrooms, chopped bell pepper and any extra sprigs of basil, marjoram and/or parsley that you have sitting around (ad them whole – the stems give flavor, too; we’ll fish those out later). Cover and allow it to come to a simmer. Give it a stir every so often and cook uncovered for a bit it it’s getting too watery.

Now, deal with the eggplants. Cut the eggplants into rounds, about ½ inch thick. Place in single layer on a plate (reserving those that won’t yet fit); sprinkle with salt and repeat a second layer of rounds if you have more waiting. Cut your squash into similarly thick rounds and place on the eggplant plate.


While the eggplant sits and the sauce cooks: shred your cheese(s), and cut the herbs and the olives. I find that wax paper is a godsend for cheese shredding. First, it’s dirt cheap; second, you don’t dirty a plate (cleaning the grater is bad enough); third, when you’re done it’s easily thrown away or, if you have extra cheese remaining, you can wrap it up into a little cigar and it’s ready for later snacking. I know that the ingredients above call for these already in their cut/shredded form, but as a time management tip – this is the place to fit this work into the process.


Grill the eggplant: as I said earlier, if you have an actual grill at your disposal, use it. Otherwise, cop out as I did and use a stovetop grill pan. “Grill” the eggplant and squash until softened and displaying “grill” marks, flipping to ensure this occurs on both sides. Working indoors, you’ll probably have to work in batches; just pile the early finishers on a plate. No need to cover them or keep them warm; soon they’ll be covered in hot tomato sauce and shoved into a hot oven.


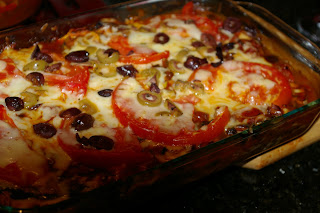
To assemble the dish for baking: First, preheat the oven to 350. In a glass baking dish (this was
intended for 2 people, so I used an 11 x 7 dish), ladle some sauce on the bottom and spread to cover the entire area. Lay down eggplant and squash pieces in a single layer, fitting them together as much as possible (we’re aiming to have a second layer of veggies, so keep this in mind as you distribute them). Sprinkle the veggies with herbs, olives and then cheese. Dot sauce over the top of the veggie/cheese layer, and spread around a bit - but not enough to shift everything around in the pan. Put down one more layer of eggplant, hopefully using up all that remains. Cover with herbs, olives and cheese, as above, saving some of each of those ingredients for one more layer. Dot with sauce (as above) and sprinkle with additional cheese, herbs and olives. Top with sliced tomatoes and sprinkle a bit of extra cheese on top of the tomato slices. Cover with foil and bake until it’s hot and bubbly – maybe 20-25 minutes (it’s not long since everything we started with was hot but if you just used sauce right out of the jar that was cold, you might have to tack on some more time). About 10 minutes before you want to take the dish out, remove the foil. Once it’s out of the oven, give it a few minutes to sit before serving -it’s molten at this point.


During the baking, move any remaining sauce from the pot it was cooked in to another vessel (I used a 4-cup glass measuring cup). Wash out the pot and fill it with water to cook up the pasta. Use sauce that remains to stir into the cooked and drained pasta (after returning it to the pot), serving additional (heated) sauce at the diner’s option.


Hot out of the oven.


Dinner is served.


Yes, Gilda. We're also happy it's Friday night.

Monday, October 11, 2010

Things I forgot to remember

Warning: non-cooking post.

Lately, I’ve been on a mini-kick of cleaning out drawers and corners of rooms – trying to eliminate clutter and to clean up things that have been left for too long. I came across a little notebook in my nightstand drawer, one of many that I’ve started over the years as a place to write to-do lists and notes on current thoughts/plans going through my head. This notebook, like all of its forbearers and those who followed, was eventually forgotten and shoved in a drawer – clearly, my method here really works. I took a couple of minutes during my cleaning orgy to leaf through the book. Most of the pages were dated, so I was able to guess at the time period of the entries – most of this dates from fall 2005. Among the pages of to-do lists and lists of dishes that I wanted to prepare in the near future, I came across a list entitled “Today I Will”, a list of things that I should aspire to do in each day – some of them are of a more lofty nature, and some are downright utilitarian (very fitting for me). This particular list really made me think back over the past few years, and all of the ups and downs experienced in that time. Parts of 2005 were difficult, but I do recall that things seemed to be looking up by the fall – I was finally trying to be happier, and I think this list demonstrates some effort to be self aware and to attempt to change my small world from the inside out. The slight upturn that fall did not stick, and I spent the next two to three years swinging back and forth from depression to feelings of muted “happiness”. Looking at this list, I can’t help but to think that if I hadn’t shoved this notebook away and had actually given thought to these items every day, I (and those close to me) may have been able to avoid much hurt and anguish. In the past year or so, things have been much better; I finally feel as though I have a shot at really being satisfied and content. I think that giving consideration to the items on this list may help; this time I won’t forget them. Here is the list in its original order.

Today I will:

Learn something new
Take an interest in something beyond myself
Made today different than yesterday
Show love
Set a goal (small or large)
Breathe deep
Smile
Reflect
Try to understand someone who puzzles me
Recognize what I can control and what I can’t
Stay focused
Work hard, fast and efficiently
Beautify my surroundings
Take a break
Treat yourself right
Take great pleasure in simple things
Find wonder in something complex
Drink more water

Thursday, October 15, 2009

Go-Lean Bars

These bars had their start as a favorite in Jim’s family, which have been ‘healthified’ by me (to the extent that you can healthify a dessert based around sugar, peanut butter and chocolate). It was always understood by Jim to be a ‘secret family recipe’. The term “Rice Crispy Treats” in Jim’s house never implied the marshmallow-butter concoction that we’re all familiar with; they had a different bar. The basic construction of their version is as follows: sugar and corn syrup heated, mixed with peanut butter and Rice Crispies, pressed into a pan, and then topped with a mixture of melted chocolate and butterscotch. They are delightful, but oh-so indulgent and completely devoid of any nutritional worth (except for protein in peanut butter, I suppose—but it’s been drowned in sugar, so that’s probably a stretch). After changing my eating habits years ago, I forbade these creatures from our home for a long time. But, Jim missed them and would speak of Rice Crispy Treats with forlorn sadness. I aim to please: I finally endeavored to improve their nutritional profile, so I could allow them to once again grace our kitchen.

If the original was actually a family recipe of his, I probably wouldn’t even be writing this entry now, as I wouldn’t want to let the cat out of the bag (I still won’t post my Grammy’s famous Clam Dip, to the apparent great relief of my paternal relatives). But here I am writing this because, as it turns out, this was not so much a ‘secret family recipe’ after all. I remember the day when he discovered this disturbing fact: we were in Jim’s parents’ kitchen and he spotted a recipe on the back of the Rice Crispy box for ‘Peanut Butter Scotcheroos’. This recipe was frighteningly similar to (read: exactly the same as) his grandmother’s top-secret recipe. “But that’s my grandmother’s secret…recipe”, he said, trailing off toward the end. I don’t know if I’ve ever seen a grown man so crushed over something not involving death or love. He still continued to make them, but with an odd combination of sorrow that they were not ‘his family’s bars’ and a conviction that somehow Kellogg’s had stolen the recipe from his grandmother, the true inventor.

So, that brings us to the present day. There’s not too much you can do to make these bars more healthful, other than making a major substitution in the type of cereal used. Rice Crispies are relatively flavorless, and therefore make a great backdrop to be drowned in sugar and peanut butter. But, they don’t provide anything in terms of nutrition. Go-Lean cereal, on the other hand, is similarly bland (it’s hardly sweetened, if at all), but provides a whopping 10 grams of fiber per 1 cup serving (go fiber!!). My first version included only Go-Lean, but I’ve recently started adding old-fashioned oats, which has met with Jim’s approval (a chocolate-smudged thumbs up). These treats are still loaded with sugar (a little less in my formulation than in the original), but at least they have something going for them since they’re high in fiber. Have a couple of these for dessert, and you’ll have the poo of your life the next morning (and as anyone who knows me very well can attest, I view the quality of that endeavor as perhaps the most important element in a great day).

I also made a few other substitutions and additions over time—not so much in the name of health, but to coax out more flavor. First, I substitute brown sugar for the white; the brown sugar provides a greater depth of flavor and you also can cut back the amount slightly because of the stronger taste. I tried substituting brown rice syrup for the original corn syrup, and did this for quite a few batches, but I’ve gone back to corn syrup because we’ve had it on hand recently—but brown rice syrup also works quite well. I also added vanilla extract (I’m a little surprised that it didn’t appear in the original) and butterscotch schnapps to the sugar mixture (butterscotch schnapps is the most wonderful thing—I’ve recently discovered it, and it’s now my secret weapon in most cookies and bars). Finally, I use natural peanut butter, knowing that Jim’s family would always use Jif/Skippy, etc. We only ‘stock’ natural peanut butter in our house, and I will not buy the ‘regular’ peanut butter, loaded with added sugars and hydrogenated oils, just for this application. Contrary to what some naysayers might claim (Cooks Illustrated comes to mind), I find that natural peanut butter works great in all baking applications—you just have to stir it well to be sure the oil is thoroughly and evenly integrated (and store it upside down).

I tried to get these bars made and the evidence cleaned up before Jim came home from work yesterday, but he came home just when I was finishing and ‘caught’ me. He walked in the front door and asked me what I was making—I gave him the chocolate-butterscotch coated spoon to lick as a clue. “Go-Lean bars! Awesome!” This time I only made a 9x9 pan, so we don’t go too overboard. I know that we could finish the 9 x 13 that I would normally make, but we certainly shouldn’t.
Go-Lean Bars

Ingredients:
½ c brown sugar
¾ c light corn syrup
¾ c smooth natural peanut butter
2 T vanilla extract
1 T butterscotch schnapps
3 – 4 c Kashi Go-Lean cereal
½ to ¾ c old fashioned oats
¾ bag semi-sweet chocolate chips (or more, if you want a thicker coating)
½ bag butterscotch chips (or more, if you want a thicker coating)

Method:
Mix brown sugar and corn syrup in large non-stick pot (you probably need something at least 4 quarts for this—I used to use our 4 qt. chef’s pan, until the nonstick coating disintegrated; recently I’ve been using a deep 14-in fry pan).

Cook over low to medium heat, stirring frequently, until the mixture loosens and bubbles just begin to come through the surface. (Note: I’m serious here—DO NOT let this mixture go too long over heat or you WILL end up with rock candy. Even if you don’t go far enough to get into rock-candy territory, if you allow the temperature of the sugars to get too high, your bars will not be tender and will instead be overly crunchy—and teeth-hurty. Take the syrup off heat when it’s loosened and just barely starting to bubble and you should be fine).

Once the sugar mixture has reached the state described above, remove the pan from heat. Stir in the vanilla and butterscotch schnapps, then the peanut butter, until well combined. Begin adding the cereal and oats, carefully folding to avoid crushing the cereal (this will take some arm strength, especially toward the end). I gave a range for the cereal amount, above—judge the final amount by eye, based on whether you want a more cereal-heavy bar, or a more gooey bar.

Once all of the cereal and oats have been incorporated, press mixture into a 9 x 9 baking dish (metal or glass; doesn’t matter). Heat the chocolate chips and butterscotch chips in a microwave safe dish for 30 seconds on high. Stir and microwave in 15-second spurts until enough of the chips are melted/melting, that you can finish the job with some vigorous stirring. Pour the chocolate mixture over the bars, spreading as evenly as possible. Keep uncovered at room temperature for a few hours until the chocolate hardens. Cover with foil and store at room temperature.


As you can see, these were a hit. We got pretty piggy with them.

Tuesday, October 13, 2009

Butternut Squash Bread


Fall has arrived! The weather is turning cooler and our minds have turned to meals inspired by this great new season. Jim has requested several cold weather delights recently, one of which was winter squash.

We’ve been frequenting the farmers market throughout the summer, and have eagerly awaited each Saturday morning visit. Unfortunately, October is the last month that our market is open, so we’re trying to ‘pack it in’ as much as possible in these sad few remaining weeks. Two weeks ago, we purchased a large butternut squash and an acorn squash as part of our massive farmers market haul. The acorn squash was consumed that weekend, but the butternut stuck around for a while—that’s the great thing about winter squashes: they have a long shelf life and don’t need to be used immediately.

I used the larger part of the butternut squash as a side to dinner last Saturday night, but I was left with the lower, bulbous portion. I pondered all week on the issue of where I could employ this leftover squash; I had a full week of dinners already planned, none of which would accommodate a squash side dish. Finally, last night I decided on the perfect application: a butternut squash quick bread (in the style of a zucchini or pumpkin bread.) My starting point was a recipe for zucchini bread from this book, with many alternations (some accidental, some intentional) made in order to come to this final product.


I threw this together in my last few minutes before Jim arrived home from work, so he was welcomed home to the smell of cinnamon and the promise of a tasty breakfast treat for tomorrow (treats like these are dessert to me and breakfast to him). Verdict: delicious, sweet—but not too sweet. It’s especially great with a smear of cream cheese.

As an extra note: if you have more grated squash than will be used in the bread, try topping a green salad with it—we did that last night after I made the bread and it was delightful!

Butternut Squash Bread

Ingredients:
DRY:
1 2/3 c whole-wheat pastry flour
1/3 c oat bran
1 ½ t baking powder
1 t baking soda
¼ t salt
2 t ground cinnamon
1 t ginger

WET:
¾ c buttermilk
½ c packed brown sugar
1 egg
1 egg white
2 T vanilla extract
1 t coconut extract
1 generous packed cup of grated butternut squash (probably close to 1 ¼ c)
handful of dark raisins (maybe ¼ c)

Method:
Mix dry ingredients in large bowl with fork (the wet ingredients will be added to this bowl later, so pick a bowl big enough to accommodate the finished batter). Mix the wet ingredients, through the extracts, in a smaller bowl, whisking to beat eggs and to ensure that everything is well combined. Add buttermilk mixture to dry ingredients, stir a few times to moisten. Add squash and raisins, and fold in until everything is combined. Spray a 8 x 4 loaf pan with cooking spray, pour in the batter and bake at 350 until a wooden skewer (or toothpick) comes out clean (I think it took mine about 50 minutes, but I admit that I wasn’t paying much attention to the time—it’s done when it’s done).

Let cool in pan for 15 minutes, then release onto a wire cooling rack to cool completely before cutting.

Happy Autumn!!

Saturday, February 9, 2008

Chicken and Wild Rice Soup

I’ve been absent for quite a while, and the story and recipe that I am about to relate is old. I’ve been busy—painfully busy—for these past few months and, while I had a chance to scribble down my recipe soon after creating this soup, I have only now found the time to relate it here. Yes, the past few months have been a whirlwind of seemingly constant work—at various jobs—sprinkled with exercise, dinners at home, sleep…and very little else. But I’ve finally found a moment to tell the story of a woman on the edge of mental collapse, a man with a sudden flu and the pot of soup that helped us both recover.

I had a very rough time last fall—fighting a gargantuan workload and an ever-deepening depression that I seemingly could not conquer. I seem to have rebounded to an extent, although I occasionally swing back into hopelessness and despair—just now the trips are shorter in duration and perhaps lack the depth of my previous journeys. I’ve mostly been working from home since last July (except for my now once-weekly stint at the bakery), so I was here the day that Jim woke up to discover that he had somehow caught a nasty flu-like sickness. He rides the metro everyday with throngs of sick people and works in somewhat close quarters with people he often describes as “freaks”, so his acquiring a flu came as no great surprise. He was sniffly, feverish and physically beat. Despite my own misery at the time, I could not help but to feel overwhelmingly that I wanted to erase his pain, to make him better.

I find my reaction to his suffering sort of curious. He was in pain and miserable, and even though I was wallowing in my own special type of misery at the time, the desire—or need, even—to erase his pain and make him feel better took me over. It became my quest…until I realized that there’s really not much I could do for him, aside from offering pity. There’s a terrible helplessness involved when you want so badly to fix what you could never really have a hope of changing. Borne of this helplessness was my offer to make him soup…if he wanted it (when he gets sick he’s usually not much of an eater—even when he really needs some sustenance). It was really the only thing I had to offer, other than the aforementioned pity and spoken expressions of care and love. Faced with the array of soup choices that I put before him, he selected a chicken soup with wild rice.

So, in the mid-afternoon, I took a break from work to ascend to the kitchen and begin my feeble attempt at curing his sickness. This offered me a nice two-hour respite from my work, and the opportunity to fiddle about in the kitchen…but it also ensured that I’d be working while I ate dinner and far beyond. After we both finished dinner, I continued to work on my computer in the basement and he lay feet away from me on the couch, still feeling like crap. Finally, when I had enough of work for the day and could hardly see straight, I announced that I was off to bed. I walked over and gave him a kiss goodnight on the cheek (so as not to catch his foul sickness). He turned and looked up at me and said, “You always take such good care of me when I’m sick. Thank you.”. For what seemed like the first time in weeks, I cracked a smile. It was a much-needed reminder that there are some things special enough to make life worthwhile, even when it seems so tough. He’s one of them, for sure.

Chicken and Wild Rice Soup

Ingredients:
3 Boneless skinless chicken breasts
1 whole onion, peeled
10 whole cloves
1 onion, diced
3 carrots, diced
3 stalks celery, diced (reserve the tops and leaves of the celery, to flavor the stock)
1 leek, well rinsed and cut into small pieces (whites and middle whites only—no greens)
8 cloves of garlic, minced
10 cremini mushrooms, sliced
15-20 sprigs of fresh thyme
4-5 branches rosemary
2 bay leaves
dried thyme (2 t ?)—adjust to your taste*
dried rosemary (1 t ?)—adjust to your taste*
dried rubbed sage (1 t ?)—again, adjust to your taste*
Fresh Italian parsley, chopped (about ¼ c)
1 14 oz can of fire roasted diced tomatoes, drained
1 cup of white wine**
½ cup of wild rice, rinsed
2-3 boxes of low sodium chicken broth

*Read: this is an estimate; I failed to write down the amount.
**I prefer to cook with Sauvignon Blanc. I avoid Chardonnay because its oaky quality will become too concentrated in the final product. I avoid Pinot Grigio because I really can’t stand to drink it…so that bottle is going to be around for a long, long time. Sauvignon Blanc I find to be non-objectionable as a drinking wine, and it doesn’t seem to have an off impact on the flavor of the final dish.

Method:
Stud the whole peeled onion with cloves. (Both the onion and the cloves add great depth to a poultry based broth, as they simmer with the other ingredients. The same might be true for vegetable stocks or other meat based stocks, but I have not experimented with that yet.)

One onion, studded

Make a bouquet garni: with kitchen twine, tie together the celery tops, whole thyme sprigs, and rosemary branches. (You can see in the picture that this time I didn’t tie the celery tops in, and instead just added them separately—in subsequent soups, they’ve gone in my bouquet garni instead, and it’s worked well…so my photos and instructions here are not in complete agreement). This quick operation will make your life so much easier when the soup is done—the herbs release a wonderful flavor and you only have to fish out one large, obvious bundle of herbs instead of hunting down individual branches.

My bouquet garni
Brown the chicken breasts in a soup pot that’s been lightly coated in olive oil (spray if you can)—not until they’re cooked through, but at least until they’re browned on each side (this will provide some additional flavor, both to the chicken itself and to the ingredients that are subsequently cooked in the pot). When browned, remove the chicken breasts to a plate and set aside. Add onions, leeks, carrots and celery to the pot. As they start to exude their juices, scrape up any browned bits from the bottom of the pot (the “fond”, source of oh-so-much-flavor). When the veggies have softened (not browned), add the garlic and cook, stirring, until fragrant—about 1 minute. Add the dried herbs (thyme, rosemary and sage), stirring to combine. Add the white wine and allow the moisture to cook off. Add the tomatoes and chicken broth (I gave a range above—start with an amount and keep adding to achieve what ever consistency you would describe as “soup”—my soups tend to be a tad “stew-like”). Add the studded onion, bouquet garni (and the celery tops if you didn’t include them in the bouquet garni), bay leaves, salt and pepper. Nestle the chicken breasts into the mixture (and pour in any accumulated juices on the plate), bring the broth to a slow boil and cover, lowering heat to maintain the slow boil. Cook until the chicken is done
When the chicken is cooked through, remove the breasts from the soup to a clean plate. When cool enough to handle, shred the chicken into small pieces and return it to the soup. Add the wide rice, return the soup to a boil, cover, lower heat and cook until the rice is done, about 45-55 minutes. Add additional broth as necessary during the cooking to maintain the desired consistency. Before serving, remove the studded onion, bay leaves and bouquet garni (and celery tops if added separately). Serve, enjoy, heal.

Bouquet garni and onion, spent and removed from the soup.

Wednesday, October 3, 2007

The Good Little (Half) Greek Girl Cooks Dinner


There’s something about cooking Greek food that just feels right to me. It could be that it’s generally a healthful cuisine, filled with lean proteins and fresh vegetables. It could be that I’ve been eating and cooking this type of food for so long that I know the flavoring and ingredient options well, and it’s an easy go-to for a nice meal (Mediterranean cuisine is probably my cooking “comfort zone”, but Jim tells me that I have a “knack” for Asian). It could be the pleasure of the flavors and aromas of the food and the warm feelings that they inspire in me-- we didn’t have a ton of Greek cuisine every day growing up, but the memories of my maternal grandmother’s food (and my mother’s, on holidays and for parties—the times when she made Greek food the most) stick in my mind and figure prominently in the way I feel about this cuisine. To me, there is no better comfort food than a big serving of spanokopita (spinach and cheese pie, wrapped in phyllo dough). Ultimately, I think there’s some part of me that just feels right when I make a Greek dinner—like I’m doing what I’m meant to be doing: carrying on family traditions while making good, healthful food to share with those around me (I largely express affection through food—which is probably obvious already in this blog). And to top it off, this food is (to me at least) the ultimate in comfort cuisine. The idea of being a dutiful little (based on my comparably diminutive size) Greek “wife” always comes to my mind as I labor over a meal of this sort…hence the title of this post (I used quotes around “wife” since I am not a wife and most likely won’t be—we’ve been engaged for five and a half years now, and I think we’re going for the gold on wedding foot dragging). So, I played the good little Greek girl last Wednesday night, and prepared a dinner of chicken and veggie kabobs, with saffron and mint brown rice and tzatziki sauce to go along. The only thing that was missing was a pan of spanokopita, either to accompany the meal or as an appetizer (no time on the weeknight; plus I hate squeezing the liquid out of frozen spinach). (As a side note here: appetizers should really be called “de-appetizers”, since they really just ruin your appetite for dinner rather than making you hungry…but I digress).
I prepared the marinade and got the chicken and veggies soaking around lunchtime, so they would be good and flavorful by dinnertime (one plus to working at home—does it counter the “minus” of feeling like you should be working any time you’re at home? I don’t know yet). The early preparation of the marinade and commencement of the flavoring process would also ensure that thereafter I could work straight through the rest of the afternoon and through dinner since I wouldn’t have to do any more cooking beyond the skewering of meat and veggies and the preparation of rice (yes, I worked while I ate dinner—I work through just about every meal these days).

You can see the glistening kabobs below, both in their raw and cooked form. When the chicken and veggies emerged from the plastic bags in which they had been marinating for hours, the smell of the food was already stunning. This aroma only improved after the application of high heat. Thankfully, grilling such small pieces of meat is quick work (and easy work—for me at least—since Jim is in charge of the grill; I admit that I’m a bit afraid of the propane tank). The meal did not disappoint—the two of us finished off the nearly 1 cup of rice that I made and almost all of the chicken and veggies. Sometimes, I wonder what the hell I was thinking in my choice of dinner dishes…not so tonight. This meal was just what I craved…we will have to do this again soon.
Plenty of garlic...I love, love, love my garlic.

And yes, I did get a new camera (a lovely Pentax digital SLR; a little present to myself for surviving the month of August , which included the absolute worst birthday I’ve ever had).
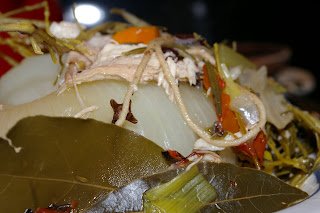
Marinade for Chicken (or any other meat) and Veggie Kabobs

Juice from a 14 oz can of diced tomatoes*
2 T chopped fresh rosemary
¼ c chopped fresh mint
½ t cinnamon
1 t paprika
½ t cumin
1/8 t clove
1/8 t allspice
1/8 t ground turmeric
½ t dried marjoram (or oregano, if marjoram isn’t available)
¼ t ground red pepper

¼ balsamic vinegar
¼ c dry white wine (or sherry, or red wine)
Juice of 1 lemon
1 ½ HEADS garlic, minced or put through garlic press
Salt and pepper to taste

Combine all ingredients in small bowl. Place meat and veggies in separate dishes or gallon size zipper freezer bags (I prefer the bags, even though it’s wasteful, because the marinade is more efficiently distributed). Pour half of the marinade over the veggies and half over the protein. Seal and soak as long as you can—the veggies can go a very long time, and chicken or beef can probably soak up to 6-8 hours before the texture is compromised (if using seafood, back off of the time substantially--the seafood will start to "cook" in the acidic wine/tomato mixture and the texture will change substantially. Go no more than between half an hour to one hour with seafood).

Veggie mix suggestions: red onion, bell pepper (any color: I love the red ones), summer squash (green and yellow—for variety), mushrooms, cherry tomatoes. Hell, whatever you can skewer or roast.

* I really wanted tomato sauce, but had none—juice from a drained can of tomatoes plus a few of the tomato pieces did well enough (and the leftover tomatoes were incorporated into a veggie lasagna on Friday…yum). But if you have tomato sauce, use some of it and maybe water it down with some extra wine.


Tzatziki Sauce

½ of a long English cucumber, diced small
6 oz fat free Greek yogurt*
¼ c (+ more if you like) chopped fresh dill
1 to 1 ½ t pressed garlic

Mix all ingredients together. Season with salt and pepper to taste. Chill to meld flavors.

*This is important: Greek yogurt is pre-strained and thick. If you use “regular” yogurt, let it drain overnight in the fridge in cheesecloth (or coffee filters, my preferred material) to eliminate the excess liquid.

Saffron and Mint Brown Rice

½ of a sweet yellow onion, diced
5 cloves of garlic, minced or put through garlic press
1 c short grain brown rice, rinsed (our recent favorite—use long grain if you prefer)
¼ c dry white wine or sherry
pinch saffron threads
1 cup water
¼ c chopped mint

Sauté onion in a medium saucepan. When softened, add garlic. Meanwhile, combine wine and saffron threads in small bowl; stir to dissolve/break down saffron. When garlic is soft and fragrant, add rinsed rice. Sauté about 1 minute and then add wine/saffron mixture. Let excess moisture boil off, then add 1 cup of water. Allow mixture to reach a boil; lower heat and cover. Cook until rice is tender, adding more water if necessary. When rice is cooked, remove from heat and stir in chopped mint. Serve.

Thursday, September 27, 2007

This is Why I Love Whole Foods

Or other stores like it that sell quality food. These breasts came from the SAME CHICKEN. How do I know? Well, they're attached. These are boneless skinless chicken breasts, and they are still attached in the middle. Instead of the Franken chicken breasts I'd get from another grocer, one of which would probably be double the size of the other, I have two chicken breast halves that came from the same animal. There's just something comforting about that.